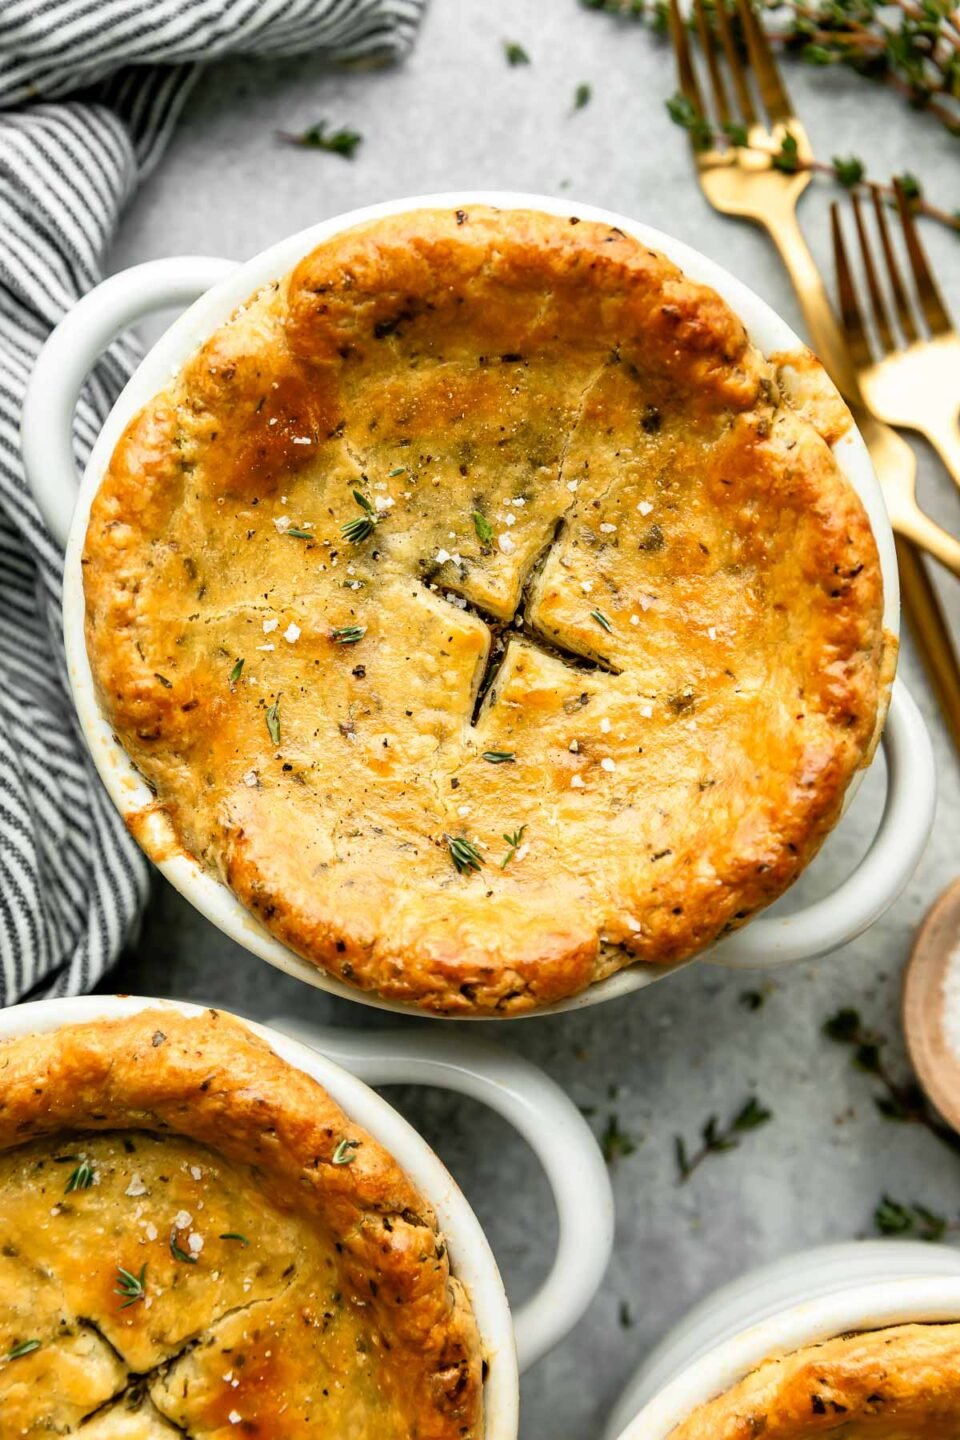
Everything You Love About Cozy, Flaky Pot Pie—Served in Personal Portions (No Sharing Required! 😉)
A warm chicken pot pie on a cold winter day is my ideal comfort food meal. Living in Minnesota, creamy pot pie with a flaky crust is one of my go-to’s when I’m craving something cozy and homemade for dinner…and PWWB readers love it too.
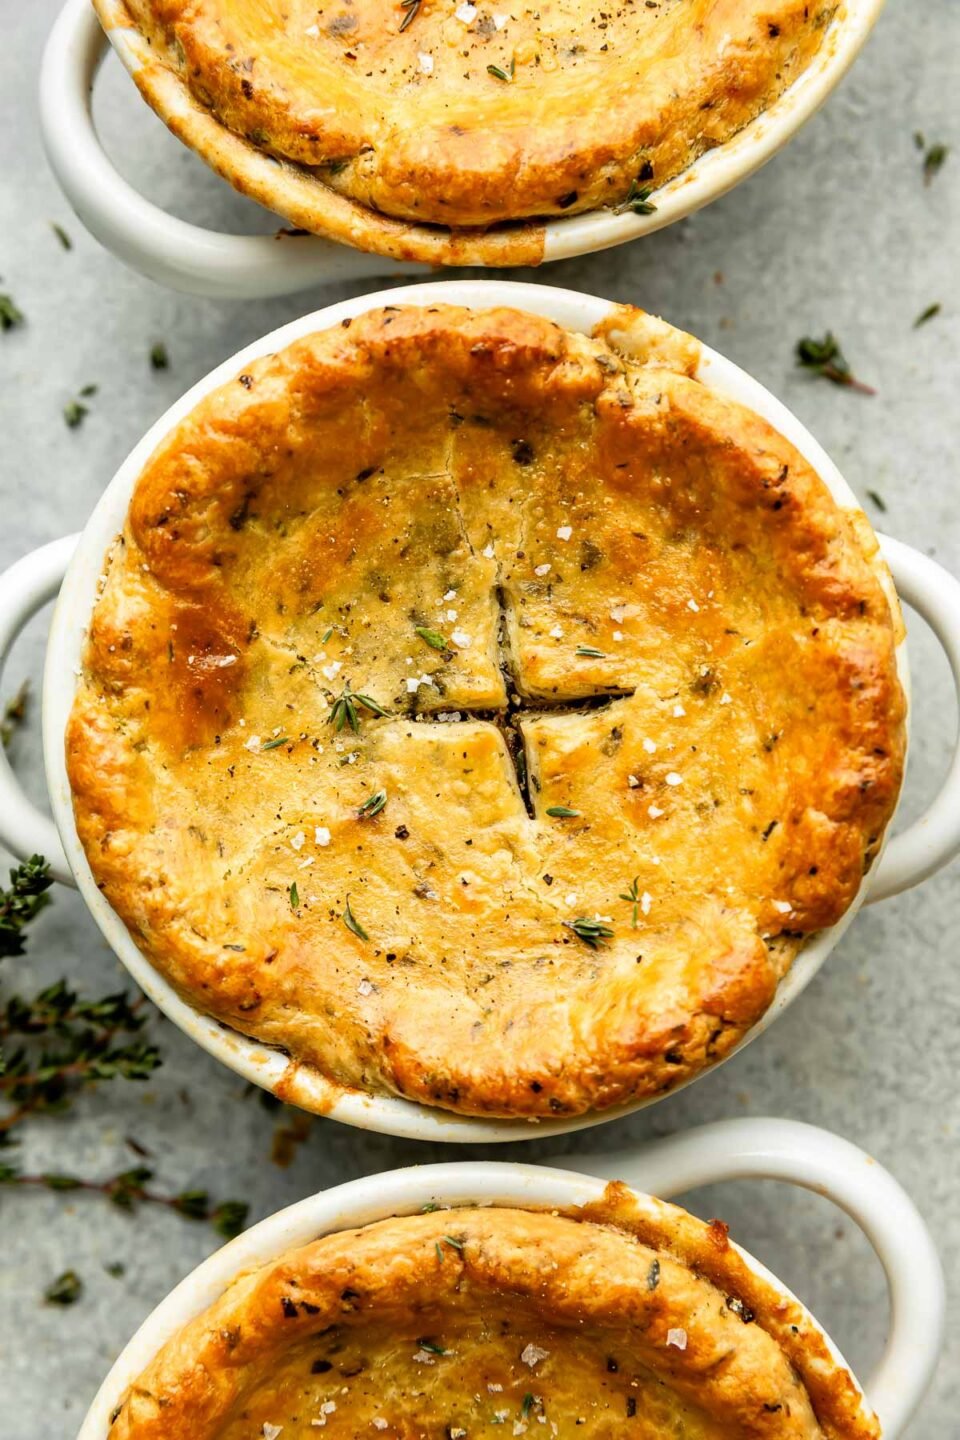
With rave reviews from thousands of PWWB readers, my Easy Skillet Chicken Pot Pie with Biscuits is one of the most popular recipes we’ve ever shared. So I’ve taken all its best features—tender chicken, creamy sauce, and herbaceous flavor—to make the cutest personal portions.

One of the things that makes this individual chicken pot pie recipe so special is the crust. Each mini pot pie is topped with an all-butter crust that’s studded with fresh herbs, hella flaky, and baked to golden-brown perfection. The dough is completely homemade but it comes together in a food processor in 5 minutes, tops. Quick, easy, and so worth the extra effort!
Plus, as someone who cooks for a smaller family, I appreciate that this recipe gives us the comfort food we love without leaving us eating leftovers for days. It’s a perfectly portioned dinner that’s perfect for anything from Sunday supper to a cozy date night on the couch.
Love making classic dishes mini? Be sure to try my popular Individual Beef Wellington or Lasagna for Two! Both small-batch recipes are perfectly portioned and fancy-feeling—ideal for at-home date nights. 💞
Maximum Flavor, Minimal Effort
3 foolproof secrets to low-fuss, flavor-packed dinners, learned from years working in restaurants.
Jess’ Cozy Dinner Necessities
 Buy Now →
  Buy Now →
  Buy Now →
  Buy Now →
  Buy Now →
  Buy Now →
  Buy Now →
Stainless Steel Measuring Cups & Spoons
Buy Now →The Easiest Homemade All-Butter Herbed Crust (With Only 5 Minutes of Hands-On Prep!)
This is my go-to homemade pie crust! It’s made with all butter, which adds incredible flavor and creates the ideal flaky-tender texture for an individual chicken pot pie topping. To make it extra special and savory, I’ve speckled with hardy fresh herbs that tie into the flavor of the creamy pot pie filling.
Quick encouragement! ⇢ Homemade pastry may sound like an intimidating time commitment but I promise you—this is EASY stuff. The food processor does all the work and it’s ready in 5 minutes or less!
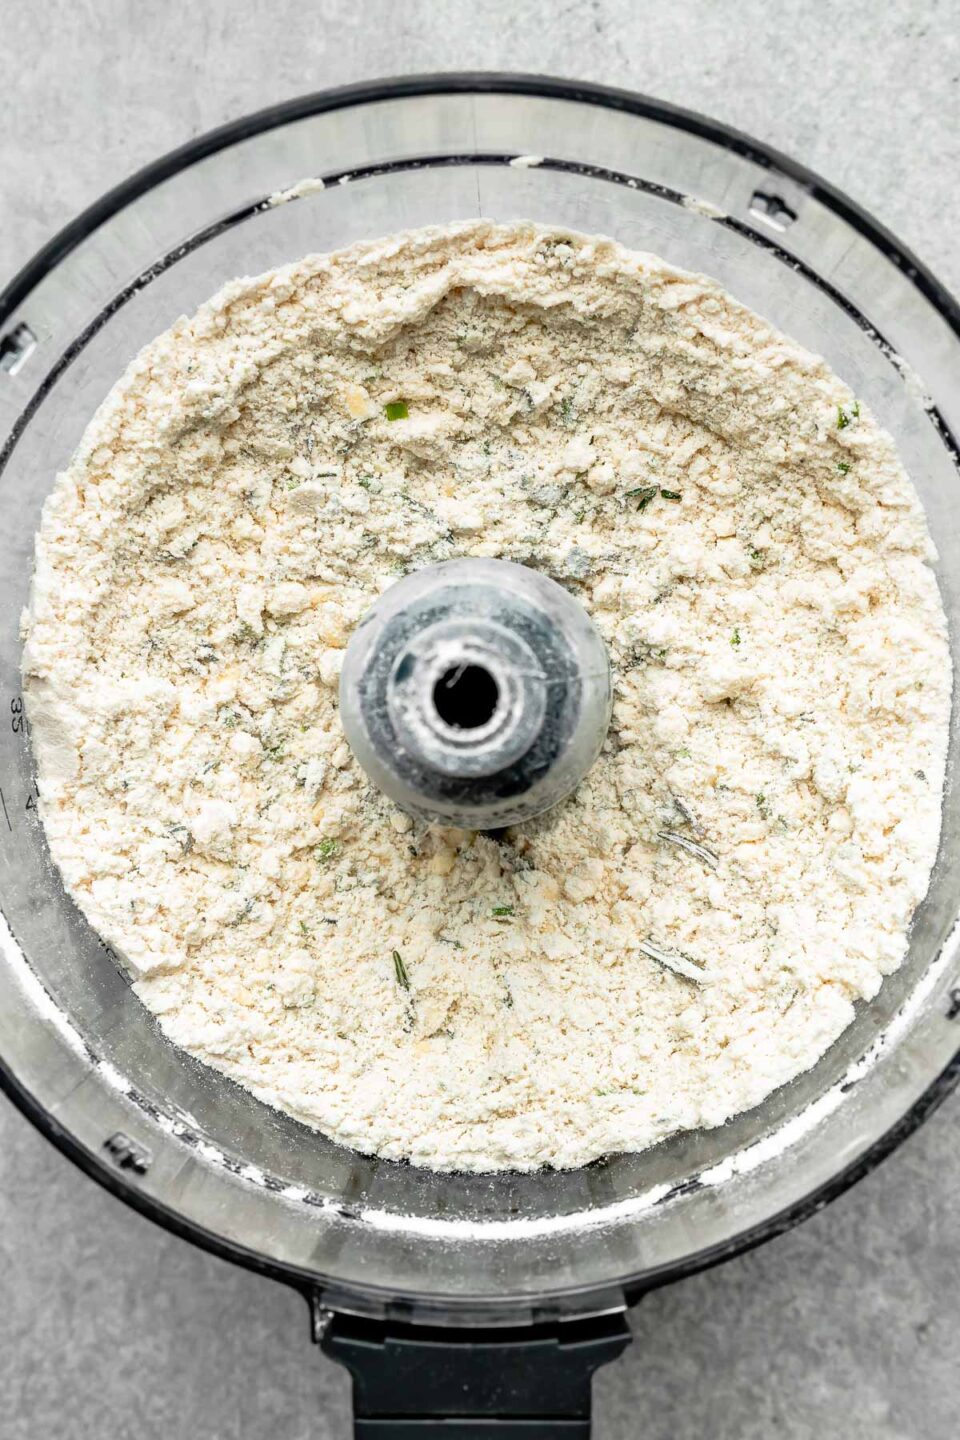

Pulse the dry ingredients with cold butter. Use your food processor to pulse flour, chives, herbs, and salt with small pieces of cold butter. Keeping your butter cold is KEY to a flaky, puffy pastry dough! The dry ingredients should just mix into the small pieces of butter and look a bit like coarsely grated parmesan cheese.
Add liquid to form a dough. Add in a little apple cider vinegar, then pulse in ice cold water, working one tablespoon at a time. The vinegar’s acidity keeps the pastry tender and the water helps form the mixture into a rough dough. The dough is ready as soon as the mixture pulls away from the sides of the bowl.
Form and chill. Use your hands to create four balls of dough, flattening each into a disc. The goal is to work quickly and keep your dough nice and chilled—the more you handle it, the more it will warm up. Wrap each disc in plastic and keep it in the fridge so it stays chilled.
Meal Prep Tip!
This herbed pastry crust keeps for up to 3 days in the refrigerator. Feel free to prep it in advance and keep it chilled until you’re ready for mini pot pie assembly.
How to Make Individual Chicken Pot Pie
If you’ve made my Skillet Chicken Pot Pie, this mini chicken pot pie recipe will be very familiar. The creamy filling is made in a skillet on the stovetop, then it’s portioned into individual chicken pot pies, topped with herbed pastry, and baked until golden. Pretty simple!
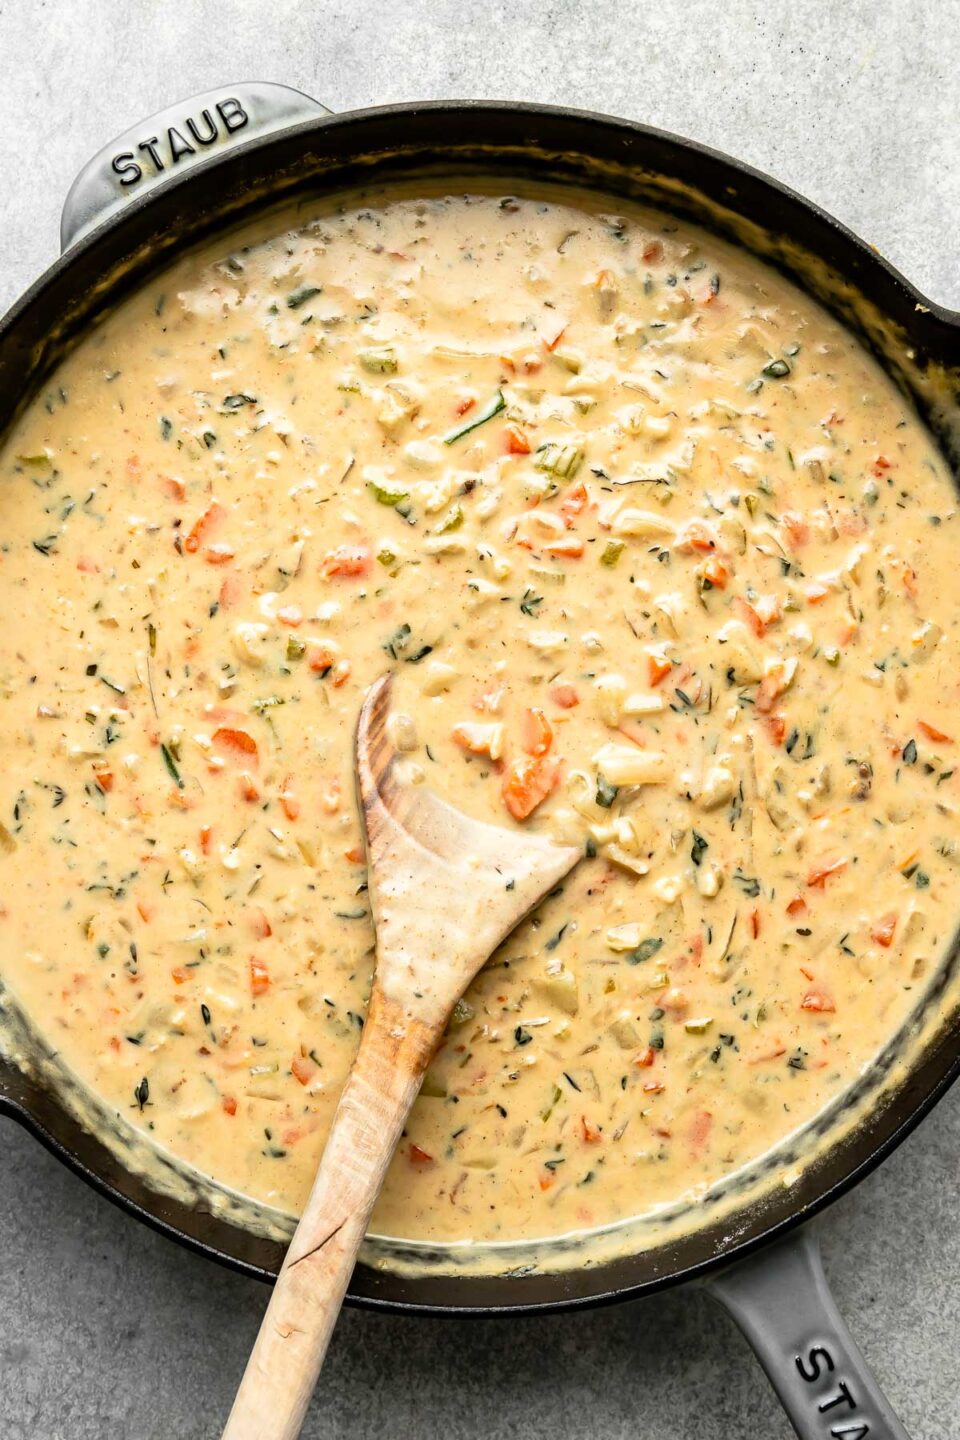
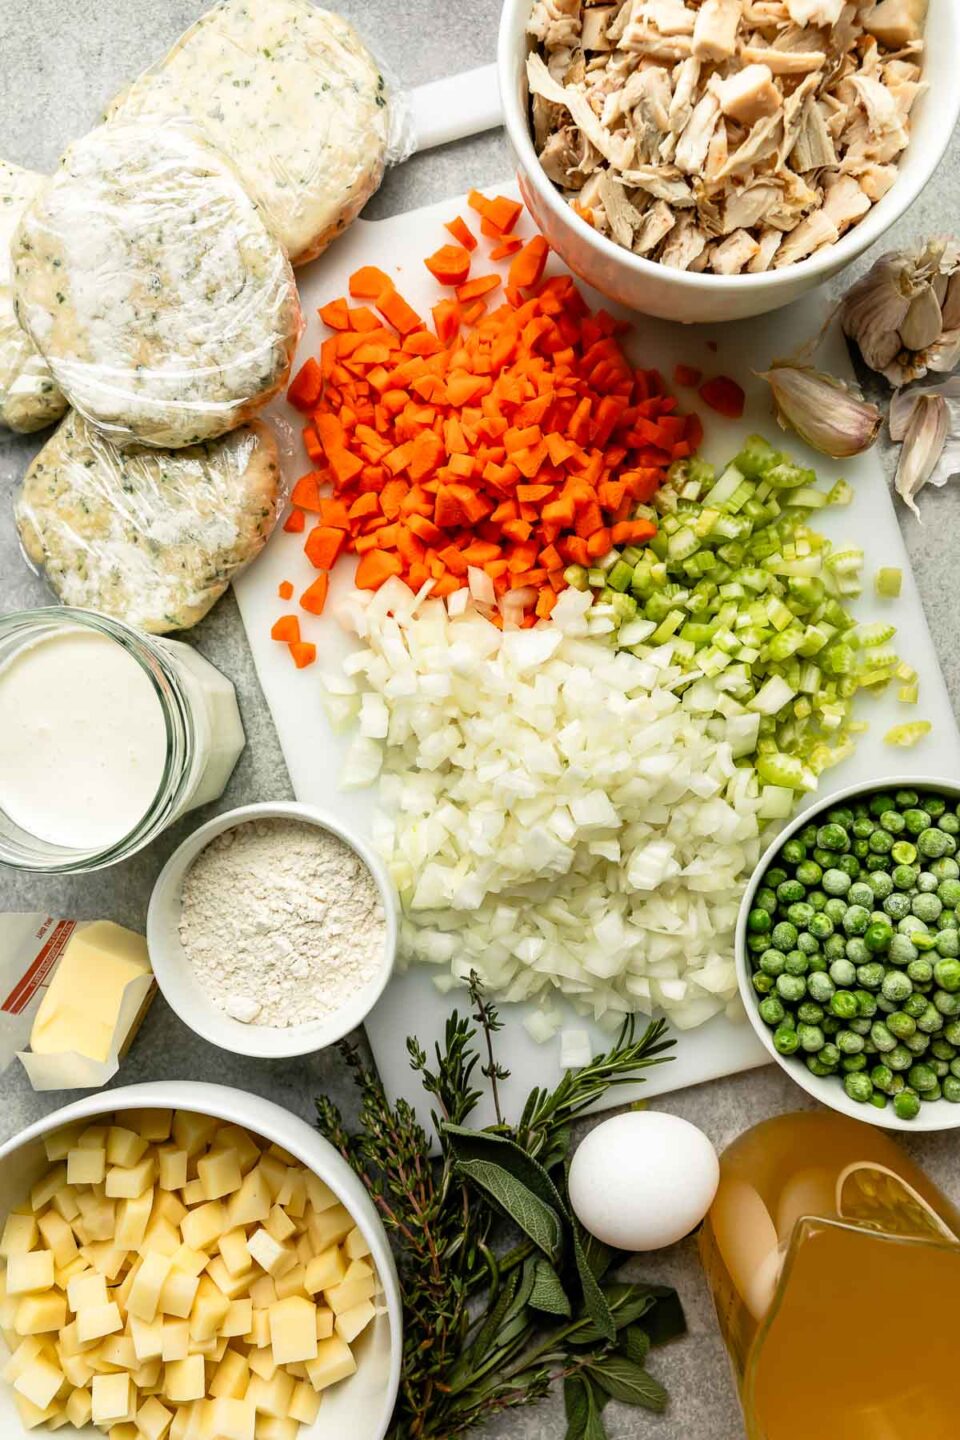
Soften the aromatics. Sauté onion, carrot, celery, and potato in butter in a large skillet on the stovetop until the veggies start to soften. Add the garlic and fresh rosemary, sage, and thyme, and cook until fragrant.
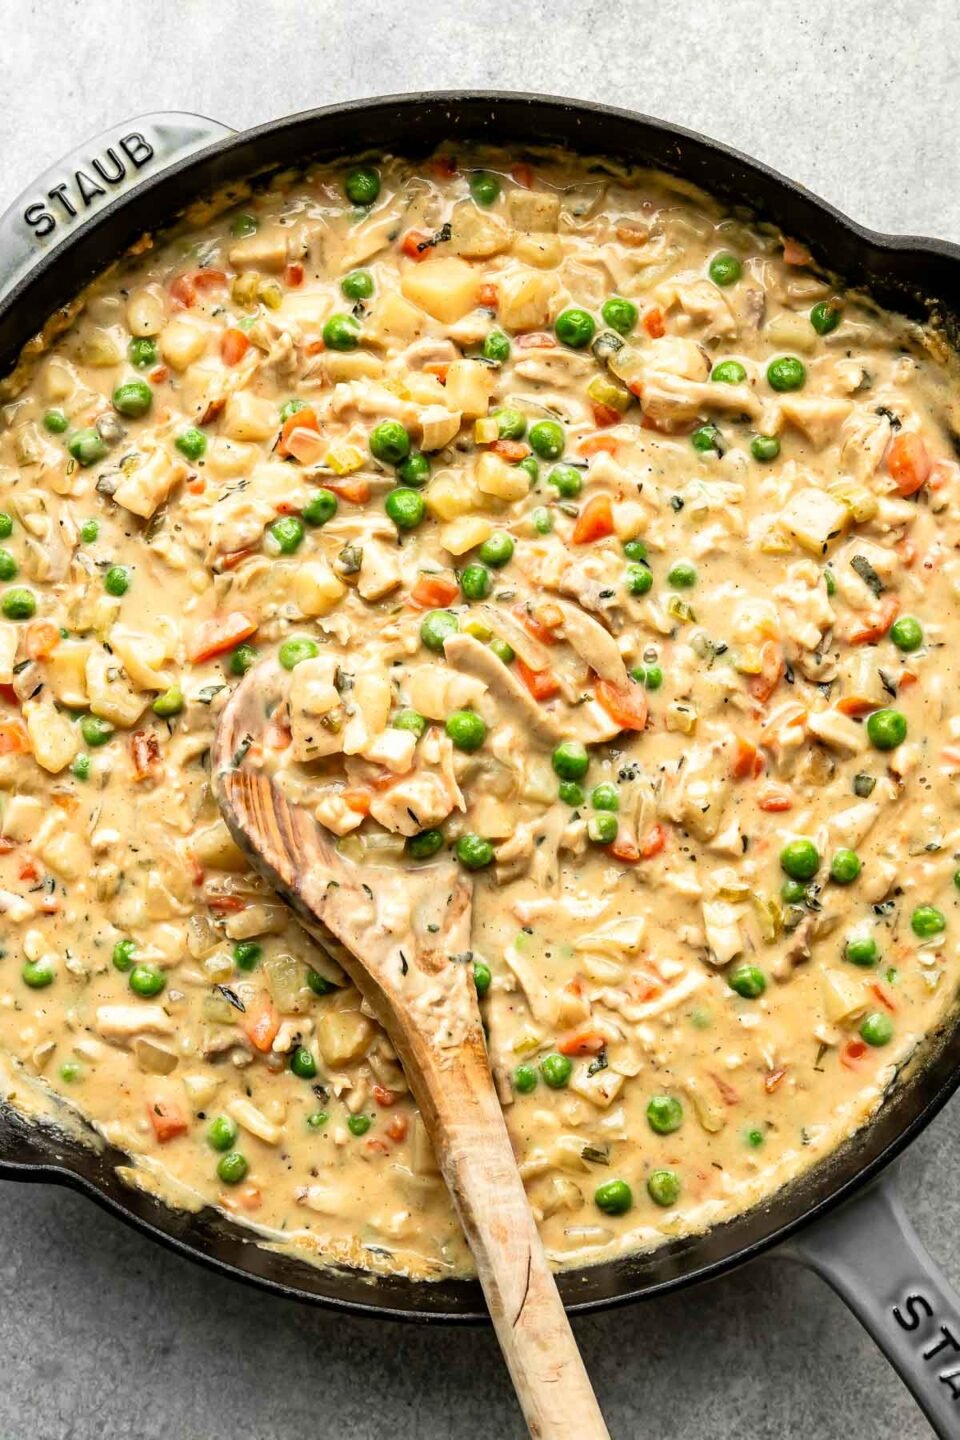
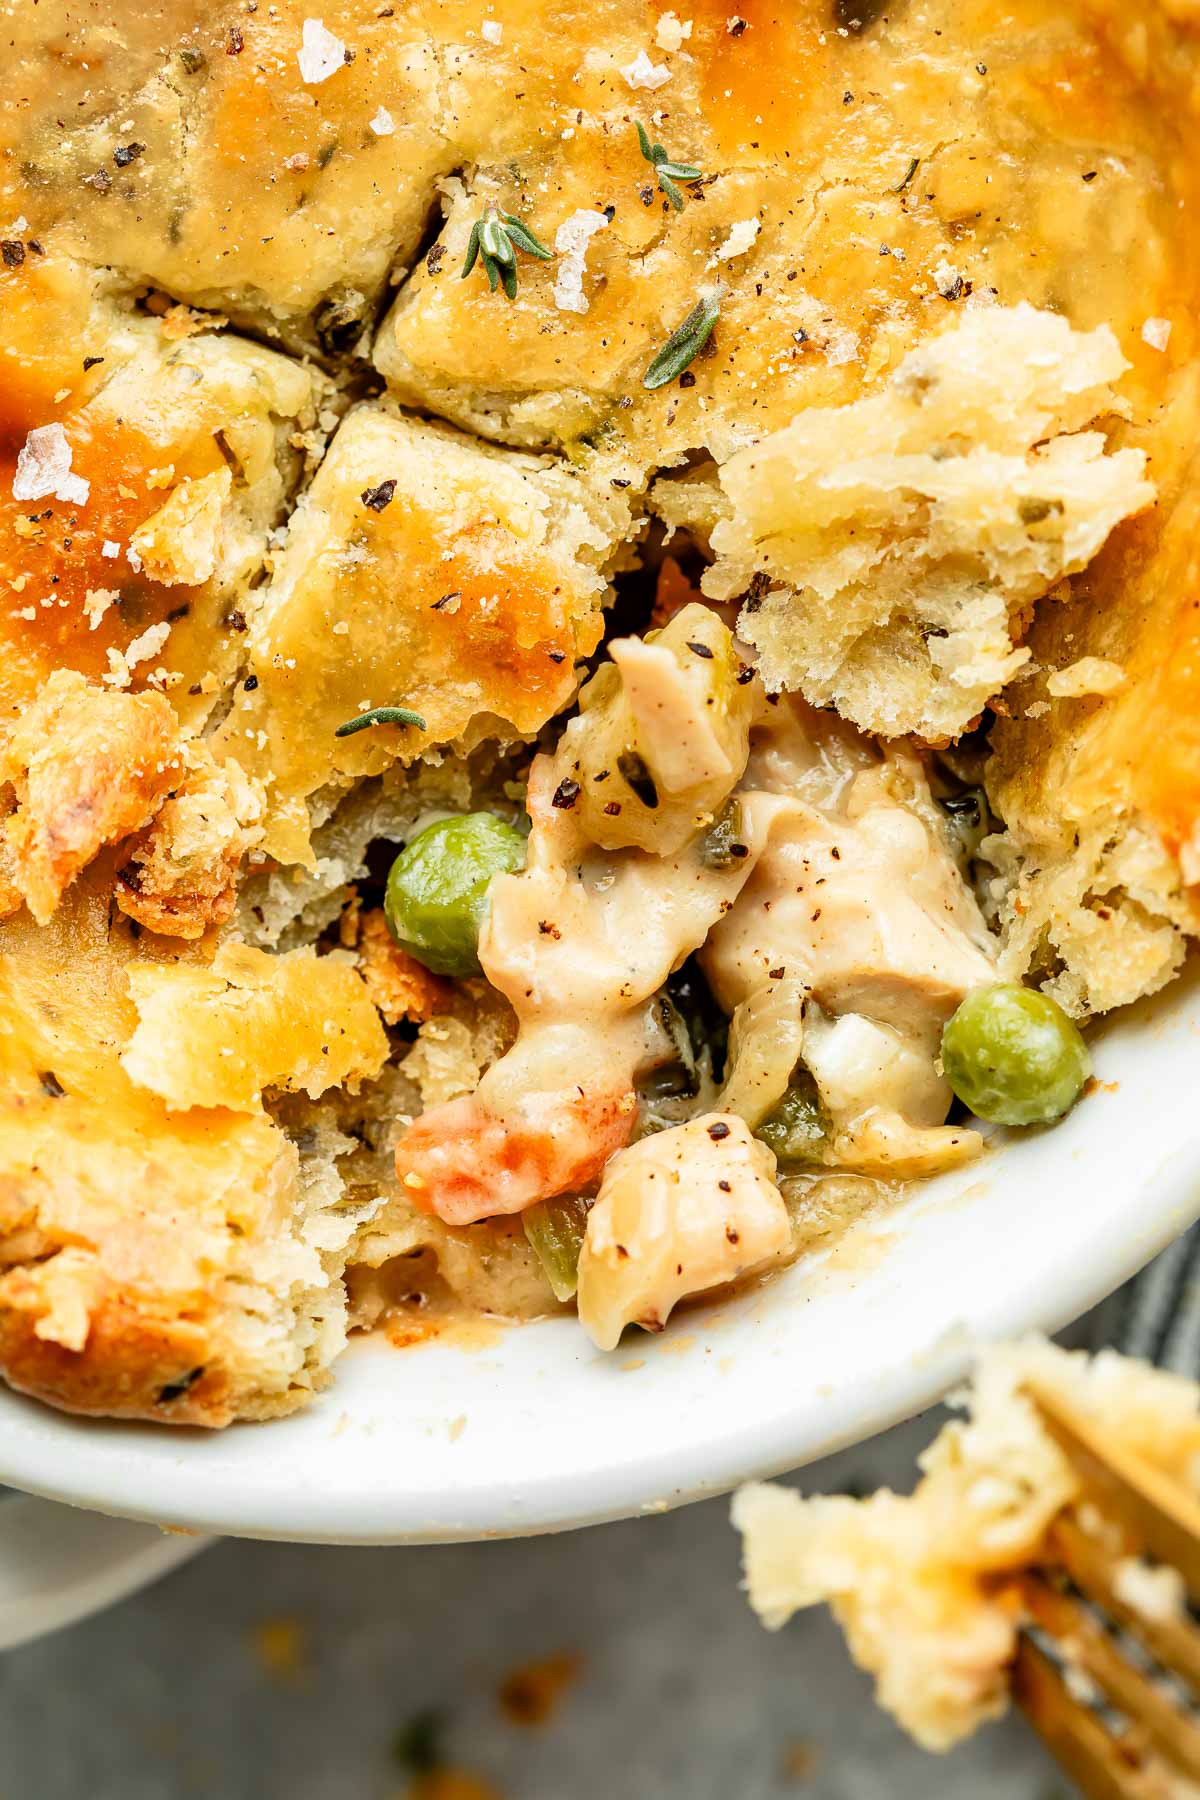
Build the pot pie filling. Sprinkle the veggies with flour (it helps the sauce thicken up!). Deglaze the skillet with white wine, scraping up any browned bits from the bottom of the pan with a wooden spoon. Bring it all together with chicken stock and heavy cream, then stir in frozen peas and shredded chicken. Feel free to use rotisserie chicken for ease!
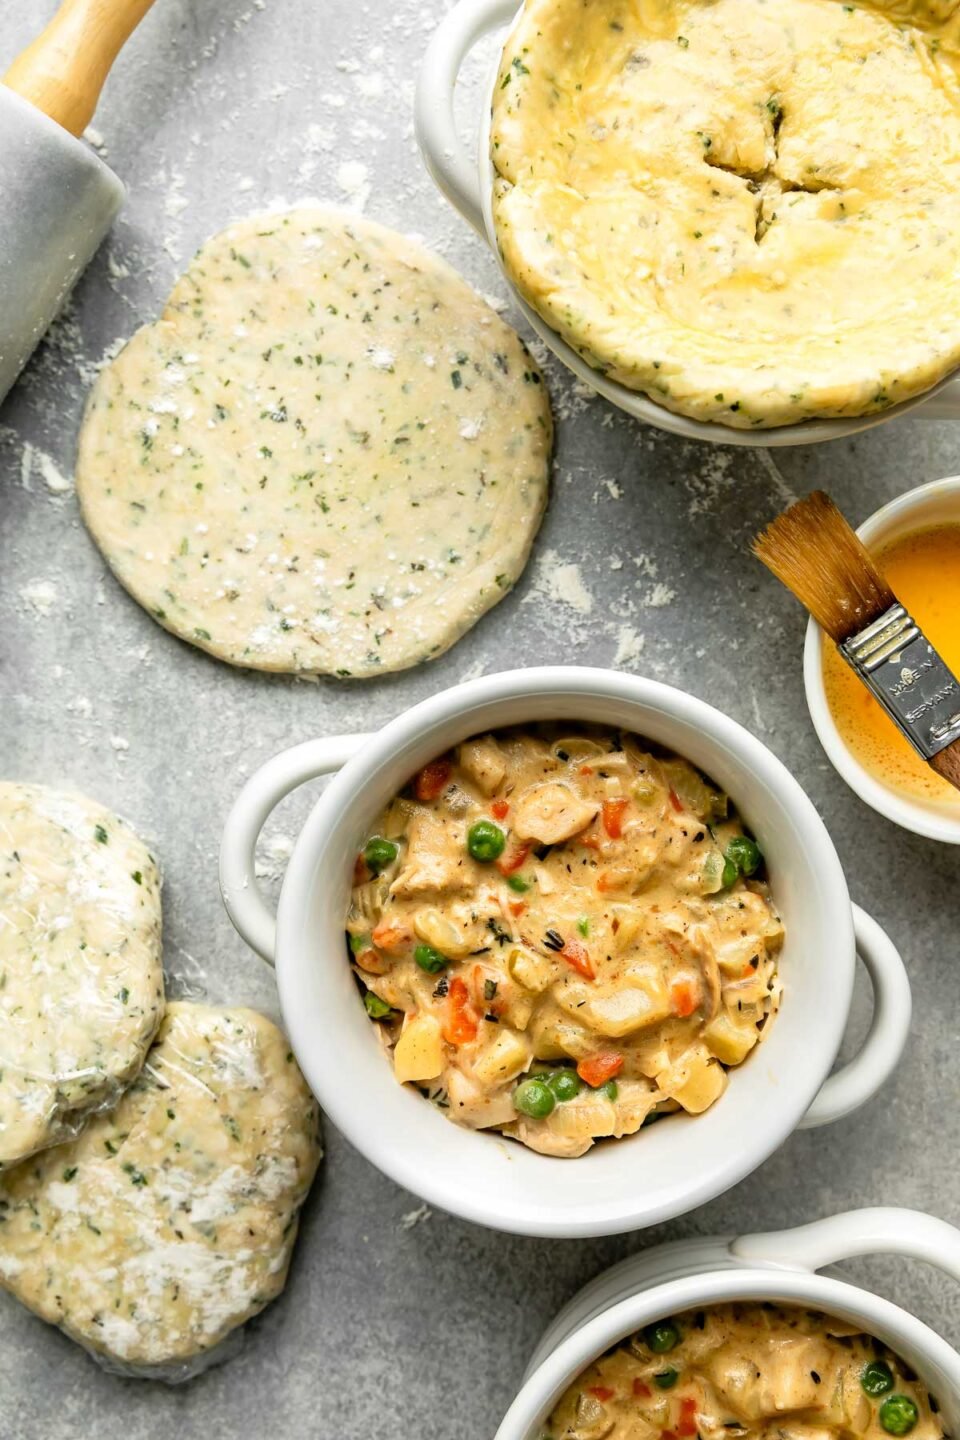
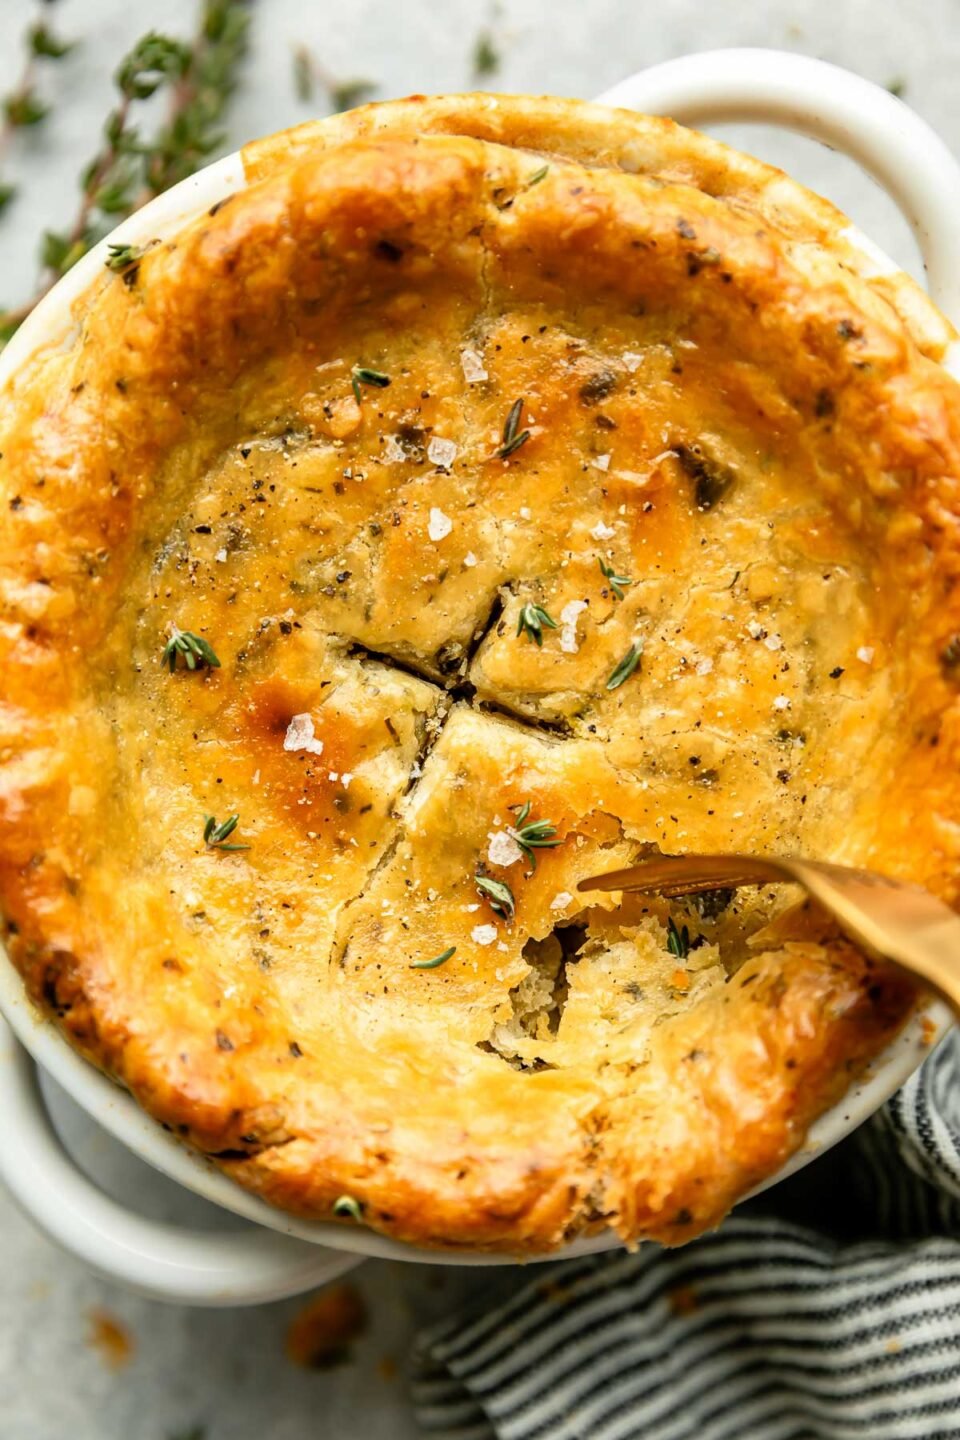
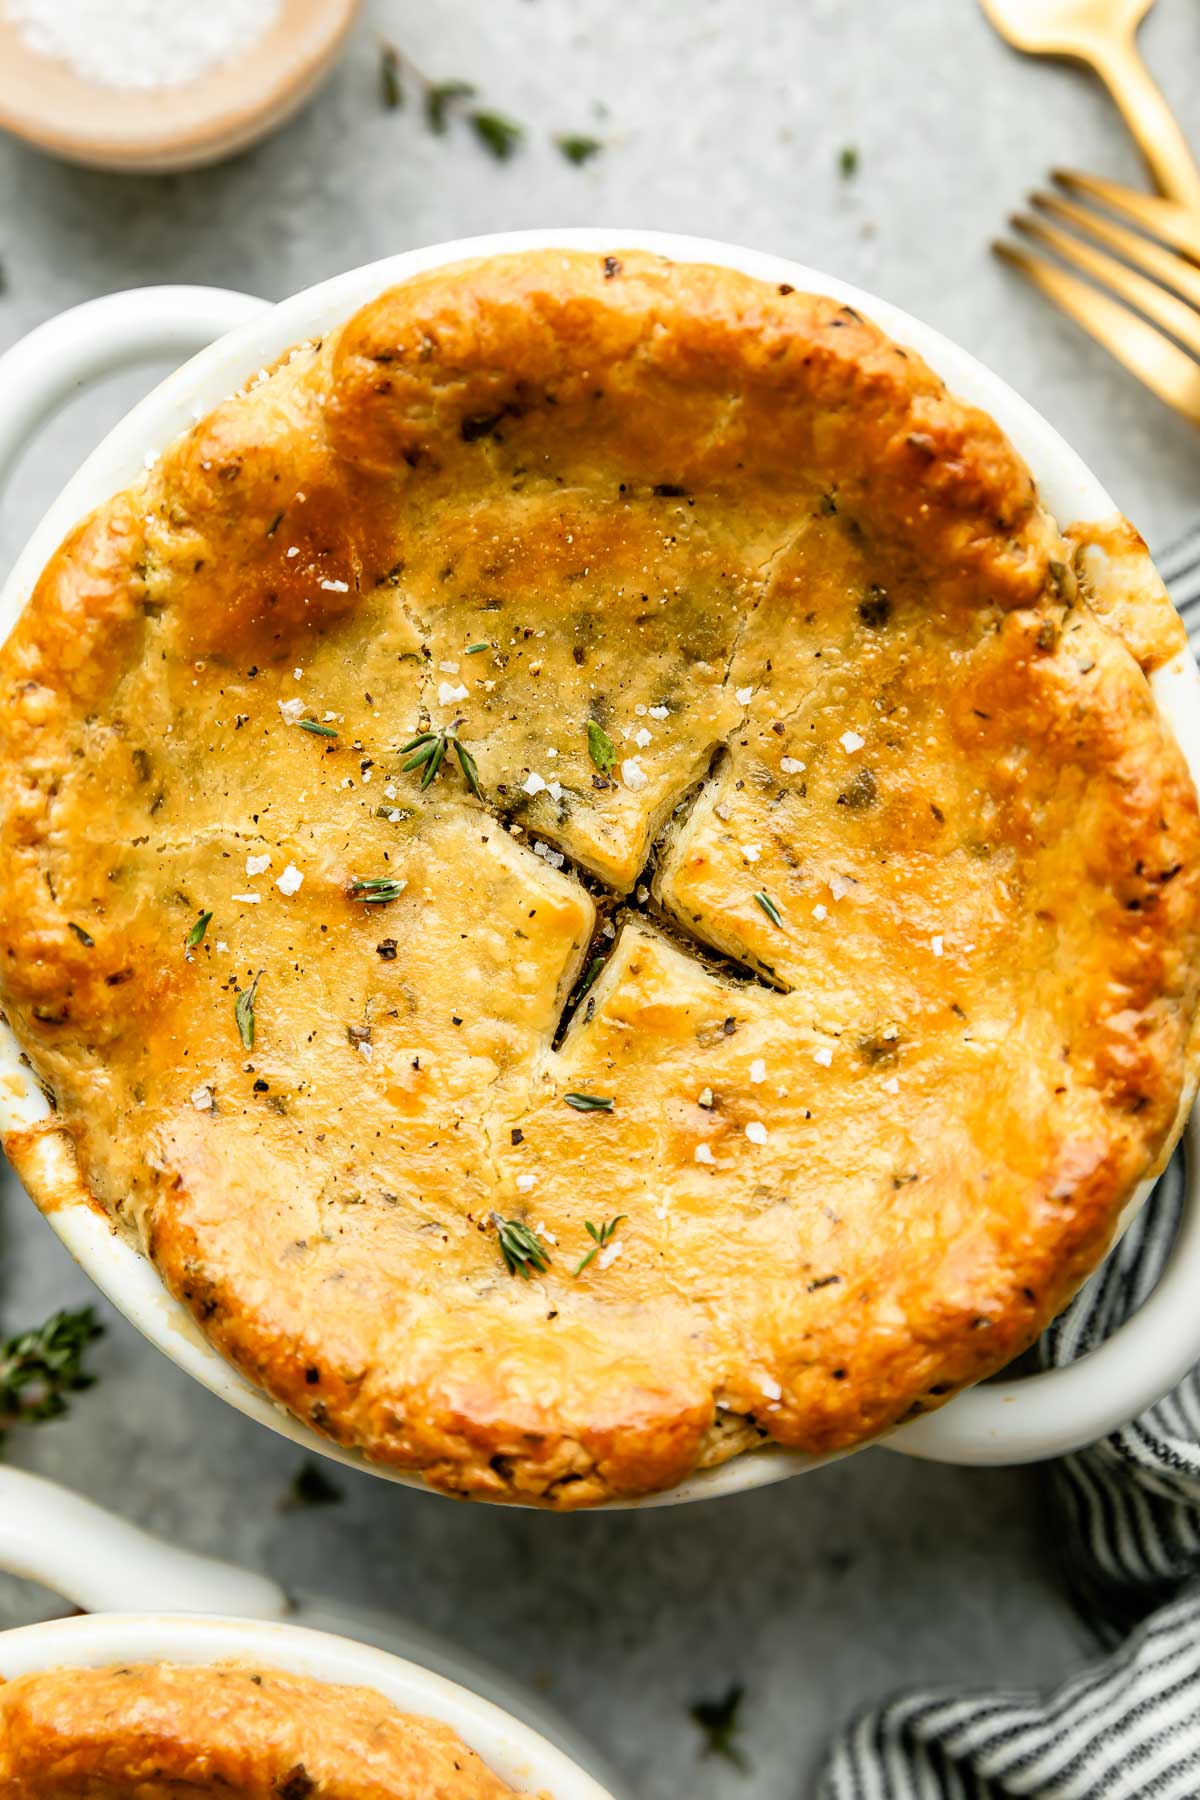
Assemble the individual chicken pot pies. Divide the pot pie filling between 4 oven-safe soup bowls and top with herbed pie crust. Tip! ⇢ Brush with egg wash before baking to create a beautifully golden-brown crust.
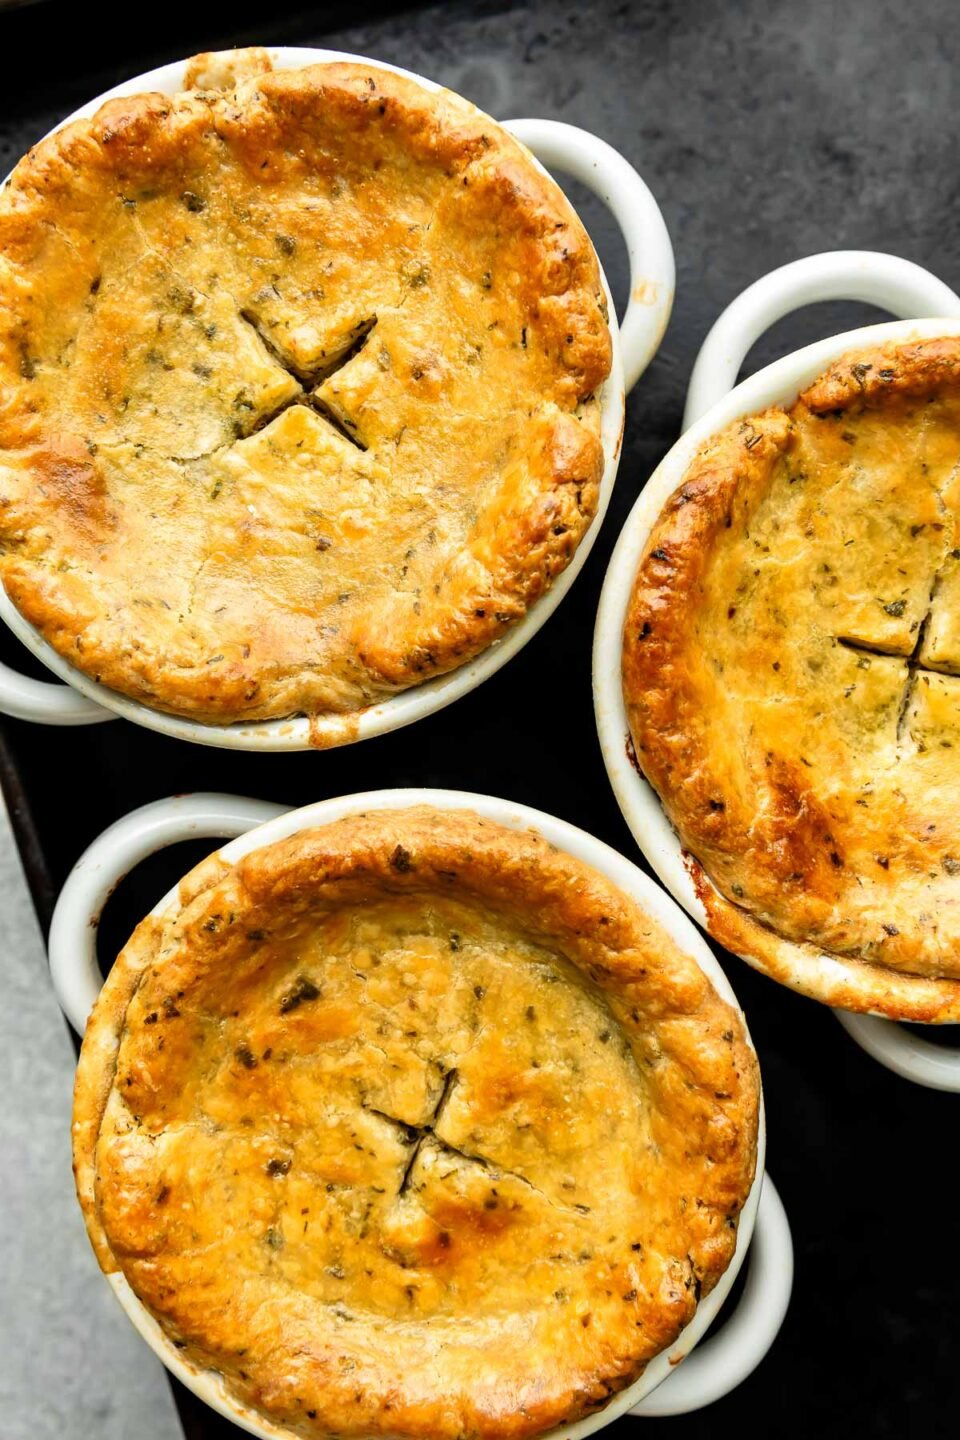
Bake the individual pot pies in a 425-degree oven for about 30 minutes. Once the crust is golden brown, remove from the oven and let the individual chicken pot pies rest for at least 10-15 minutes before digging in.
Make-Ahead & Freezing
These individual chicken pot pies are incredibly make ahead-friendly! As I tested this recipe, I fell in love with freezing half of the filling and pastry dough for an easy dinner down the road. Check the Recipe Notes, below, for step-by-step guidance!
3 Tips for Perfectly Flaky Pot Pie Crust
The goal of any chicken pot pie—big or small—is a beautifully golden, flaky, and tender crust topping. Here are 3 tips to keep in mind as you assemble this recipe…
- Keep the dough chilled until you’re ready to use it. Cold butter bursts open in a hot oven, creating flaky layers of pastry.
- Slice a small vent in the dough before baking. This allows steam to escape as it bakes. If it has nowhere to go, moisture from the filling stays trapped inside and makes your pot pies soggy!
- Brush the pastry with egg wash so it becomes beautifully golden brown as it bakes in the oven.
Serving Suggestions
Individual chicken pot pies make the coziest all-in-one meal for date night, Sunday supper, or any chilly winter evening!
I like to serve them alongside a light and fresh salad like my Mixed Greens Side Salad or some simple roasted veggies. Perfection!
I can’t wait for you to try this Individual Chicken Pot Pie recipe! If you do, be sure to let us know! Leave a comment with a star rating below. You can also snap a photo and tag @playswellwithbutter on Instagram. We LOVE seeing your PWWB creations! ♡ Happy cooking!
Print
Individual Chicken Pot Pie with Flaky Herbed Crust
- Prep Time: 45 minutes
- Cook Time: 1 hour 15 minutes
- Total Time: 2 hours
- Yield: serves 4
- Category: Main Dishes
- Method: Baked, Stovetop
- Cuisine: American
Description
Classic comfort food, made mini: Individual Chicken Pot Pie! Whether you have a small family like me or you’d like to serve your dinner guests personal portions, this recipe is so much fun.
The creamy chicken filling will be familiar to you if you’ve ever made my popular Skillet Pot Pie recipe. I love it because it’s loaded with hearty vegetables and laced with aromatic fresh herbs.
For this recipe, I’ve opted for a homemade topping, using my go-to pie crust. It’s made with all butter for beautifully golden and flaky layers, and I’ve added some fresh herbs to it to complement the savory flavor of the filling. It’s so good, but if you prefer to use store-bought puff pastry as an easy shortcut, go for it!
And while homemade filling and homemade crust requires a little bit of prep, it can easily be done in advance. I’ve laid out a few different make-ahead options for you in the Recipe Notes, below.
Ingredients
for the chicken pot pie filling:
- 3 tablespoons unsalted butter
- 3 medium carrots, diced
- 2 stalks celery, diced
- 1 large yellow onion, diced
- 1 large Russet potato, peeled and diced
- 6 cloves garlic
- ¼ cup finely chopped hardy fresh herbs (fresh rosemary, sage, thyme or substitute 1 heaping tablespoon dried poultry herbs)
- ¼ cup all-purpose flour
- optional: ½ cup dry white wine
- 2 cups chicken stock
- 1 cup heavy cream
- 12 ounces shredded chicken breast (approx. 2 heaping cups)
- 1 cup frozen peas
- kosher salt and ground black pepper, to season
for the flaky herbed crust:
- 2 cups all-purpose flour plus more for dusting
- ¼ cup roughly chopped fresh chives
- ¼ cup destemmed hardy fresh herbs (fresh rosemary, sage, thyme)
- 1 heaping teaspoon kosher salt
- ¾ cup cold unsalted butter, diced into ½-inch cubes
- 1 tablespoon apple cider vinegar
- ice water
- egg wash (1 large egg beaten with 1 tablespoon water)
Instructions
- Prepare the flaky herbed crust: To the bowl of a food processor, add the flour, chives, herbs, and salt. Pulse to combine well. Add the cold butter. Pulse just enough to cut the butter into the flour, aiming for pea-sized pieces of butter—the flour mixture should look similar to coarsely grated parmesan cheese. Pulse in the apple cider vinegar, then pulse in 1 tablespoon of ice water at a time, just until the mixture begins to pull from the side of the bowl—this usually takes 5-6 tablespoons of water.

- Divide and chill the dough: Transfer the mixture to a lightly floured surface. Working quickly and carefully, use your hands to press the dough into a ball and flatten into a disc. Divide into 4 equal pieces, pressing each piece into a ball and flattening into a dish. Wrap in plastic and transfer to the refrigerator to chill. Dough can be prepped up to 3 days ahead of time.
- Prep the chicken pot pie filling: Add the butter to a large skillet over medium heat. Once melted, add in the onion, carrots, celery, and potato. Season with 1 teaspoon kosher salt and ground black pepper as desired. Stir to combine. Cook, stirring occasionally, for 5-7 minutes, until the veggies are softened and slightly browned. Stir in the garlic and fresh herbs. Cook for another 1-2 minutes, until fragrant.
- Make the chicken pot pie sauce: Sprinkle the flour over the softened veggies, stirring to combine well. Cook for 1-2 minutes, until deeply browned. While scraping the bottom of the skillet with a wooden spoon, slowly pour in the white wine. It will bubble vigorously, almost cooking all the way down very quickly. Be sure to scrape up any brown bits that may have formed at the bottom of the skillet—that’s where the flavor is! Once the wine is reduced, stir in the chicken stock and heavy cream. Bring to a simmer and cook for 4-5 minutes, stirring occasionally, until thickened slightly.
- Finish the chicken pot pie filling: Stir the shredded chicken and frozen peas into the chicken pot pie filling. Simmer 1-2 minutes longer, then remove from the heat. Taste and season with additional kosher salt and ground black pepper as desired.
- Assemble the individual chicken pot pies: Preheat the oven to 425 degrees F, ensuring a rack is positioned in the center of the oven. Divide the pot pie filling between 4 oven-safe soup bowls. Transfer to a baking sheet and set aside. Remove the chilled pot pie crust dough from the refrigerator. Working one at a time, roll out each portion on a lightly floured surface—aim for a circle about 1-inch wider than your soup bowls and about ⅛-inch thick. Brush egg was around the rim of each soup bowl, then press the pot pie crust over top. Generously brush the surface of the crust with egg wash, then slice a small vent into the center.
- Bake the individual chicken pot pies: Transfer the individual pot pies to the oven. Bake 30-35 minutes, or until the crust is beautifully golden brown. Remove from the oven and rest 10-15 minutes before serving.
- Serve: Once cool enough to handle, serve the individual chicken pot pie alongside roasted vegetables or a light and fresh salad. Enjoy!


Notes
Jess’ Tips and Tricks:
- Oven-safe soup bowls: Oven-safe bowls are essential to this recipe since the goal is to bake and serve individual portions. For four generous portions, I suggest using 16-20 ounce soup bowls—I love these Farmhouse Soup Bowls, but soup crocks like these work well too. If you prefer smaller portions, you can also divide the mixture between six or eight 12-ounce ramekins.
- White wine: For this recipe, a dry, unoaked white wine works best—I typically cook with Pinot Grigio. If you prefer not to cook with alcohol, simply omit the wine. Once the chicken pot pie filling is assembled (through Step 5), you may wish to stir in 1 tablespoon of fresh lemon juice (approx. ½ lemon) for balanced brightness.
- Easy recipe shortcut: If you’re short on time and prefer not to make homemade crust, you can easily skip Steps 1-2 by using store-bought puff pastry instead. Be sure to thaw the puff pastry overnight in the refrigerator and keep it chilled until you’re ready to assemble the individual chicken pot pies (Step 6). For a special touch, sprinkle fresh herbs over the egg washed pastry.
Make-Ahead Guidance: Since there are a couple of different components involved in this individual chicken pot pie recipe, prepping it ahead of time is a great option for weeknight cooking or an effortless date night.
- Make-Ahead Option #1 – Prep components up to 3 days ahead of time: Prepare both the the flaky herbed crust and chicken pot pie filling up to 3 days ahead of time. For the crust: prepare according to Steps 1-2, wrap tightly in plastic, and store in the refrigerator for up to 3 days. For the filling: prepare according to Steps 3-5, cool completely and transfer to an airtight container, then store in the refrigerator for up to 3 days. At dinnertime, simply preheat, assemble, and bake according to Steps 6-7.
- Make-Ahead Option #2 – Freeze components for later: If you’re cooking for 2 and would like to save the remaining portions for another time, the flaky herbed crust and chicken pot pie filling both freeze really nicely. For this approach, I suggest preparing the dough according to Steps 1-2 and rolling it out individual crusts according to Step 6. Layer parchment between the crusts and transfer to a freezer bag. Transfer cooled pot pie filling to a freezer container. Freeze up to 3 months. Thaw in the refrigerator overnight, then assemble and bake according to Steps 6-7.
Storage and Reheating: Leftover individual pot pie will keep, covered well and stored in the refrigerator, for 3-4 days. Reheat in the microwave until warmed through.
Follow along with Plays Well With Butter on Instagram, YouTube, Facebook, and Pinterest for more unfussy recipes that pack a big punch of flavor!


Wonderful recipe for individual chicken pot pies! The creamy filling is perfectly seasoned and this buttery crust is the best. It is a lot of work to prepare everything all in one day, but it was well worth it. This is a 5-star review!
Thank you so much, Betty! 🙂 We’re thrilled that you loved it!
This crust is actual perfection! Amazingly crispy. I love the fresh herbs for taste and extra antioxidants. I use the leftover crust to make little crackers for dipping!