The Easiest Way to Make Tender, Charred Beef Bulgogi at Home (Inspired by KBBQ!)
Going out to eat at a Korean BBQ restaurant is one of my family’s all-time favorite ways to share a special meal together.
If you’ve never been to a KBBQ joint before, it’s a pretty cool dining experience—very communal and totally hands-on. You sit around a table, sizzle a variety of marinated meats over hot grill plates, and enjoy them with whatever banchan (little side dishes and condiments) you love most.
Since there aren’t a ton of KBBQ joints near us, my mom and I set out to recreate the experience at home.

Our only hold-up was replicating the KBBQ-esque caramelized char achieved by quickly cooking meat on piping hot grill plates. Deeply caramelized edges are everything I crave when I want beef bulgogi!
The obvious solution is using a grill, but we wanted a recipe we can enjoy year-round here in Minnesota…so Mom found the answer in the oven!
Mom’s beef bulgogi recipe uses a pan-sear and broil method to quickly achieve smoky-sweet tenderness with crispy craveable edges, just like KBBQ! 🙌🏼 The thinly sliced beef sears in minutes and then cooks super quickly under the broiler, where the sugars in the bulgogi marinade caramelize under high heat.
It’s the best way to recreate KBBQ beef bulgogi at home—and it’s pretty darn easy too!

Maximum Flavor, Minimal Effort
3 foolproof secrets to low-fuss, flavor-packed dinners, learned from years working in restaurants.
Jess’ KBBQ Essentials

Zwilling Enfinigy Power Blender – Black
Buy Now → Buy Now →
  Buy Now →
  Buy Now →
Zwilling Madura Plus Non-Stick Fry Pan
Buy Now → Buy Now →
Stainless Steel Measuring Cups & Spoons
Buy Now →Thinly Sliced Beef is a MUST for Bulgogi
The best beef for bulgogi is a tender cut like ribeye or top sirloin. I prefer using ribeye (pictured); its gorgeous marbling translates to BIG flavor. Sirloin also works great; it’s a slightly more budget-friendly cut that will give you the same juicy, tender results.

If you’ve ever been to a KBBQ restaurant then you’ve noticed how thinly sliced the meats are. This helps them cook quickly on the hot plate at your table, so you always have a tender, caramelized bite.
Thinly slicing your steak is a must for homemade beef bulgogi! The easiest way to do this is by chilling your beef in the freezer for 30 minutes or so. This firms up the meat so it is much easier to cut into thin strips.
Store-bought shortcut! ⇢ Your local Asian grocery store may also sell pre-sliced beef for bulgogi. It’s a great shortcut—all you have to do is take it out of the package and toss it in the marinade. Easy!
My Family’s Beef Bulgogi Marinade
I inherited my Go-To Bulgogi Marinade recipe from my maternal Grandma Marian. She lived in Hawaii, so she used popular local ingredients like shoyu, brown sugar, and Asian pear.
Over the years, I’ve added a few of my own twists to recreate the savory-sweet and aromatic flavor of my favorite Korean bulgogi experiences. The result is bold and punchy but also really well-balanced.


To make the bulgogi marinade, blend shoyu (soy sauce), brown sugar, mirin (rice wine), sesame oil, gochujang (Korean chili paste), garlic, onion, ginger, and Asian pear until smooth. Pour the mixture over the thinly sliced steak. For maximum flavor, be sure to marinate the bulgogi beef for at least 12 hours.
How to Make Beef Bulgogi Using a Pan-Sear then Broil Method
Mom and I tested this recipe many ways to ensure it achieves the irresistible char and tenderness that makes KBBQ so special.
Through recipe testing, we learned that the easiest way to make KBBQ-style bulgogi at home is to sear the steak on the stovetop, then finish it under the broiler. The thinly sliced beef stays super tender, while the quick cook and high heat creates smoky sweetness and charred, caramelized edges—all without a grill or hot plate!
(And it all happens in about 15 minutes. 🙌🏼)


Prep Tip! ⇢ Bring the marinated bulgogi steak to room temperature before you begin cooking to help create the golden-brown sear we’re after.
Sear the steak. Add the bulgogi beef to a preheated skillet on the stovetop, shaking off any excess marinade as you go. The steak will form a beautiful golden sear in about 1 minute. Flip the beef over to sear the other side, then repeat in batches as needed. Why? ⇢ Overcrowding the pan bogs it down with moisture, which gets in the way of creating a good sear.
Broil the beef bulgogi. Transfer the seared steak to a baking sheet lined with tin foil and place it directly under the broiler in your oven. Broil for 2-3 minutes and watch as the sugars in the bulgogi marinade caramelize in the high heat. The slices of beef will look irresistibly charred and bubbly—exactly what we’re aiming for!
Optional, but encouraged! Prep some crispy bulgogi bean sprouts. For a quick and easy side dish, Mom always takes a few minutes to sauté mung bean sprouts and scallions in the pan used to sear the bulgogi beef. Why? ⇢ The veggies soak up the savory-sweet richness on the bottom of the pan in the most delicious way, so be sure to scrape up those flavorful browned bits as you cook!
Serving Suggestions

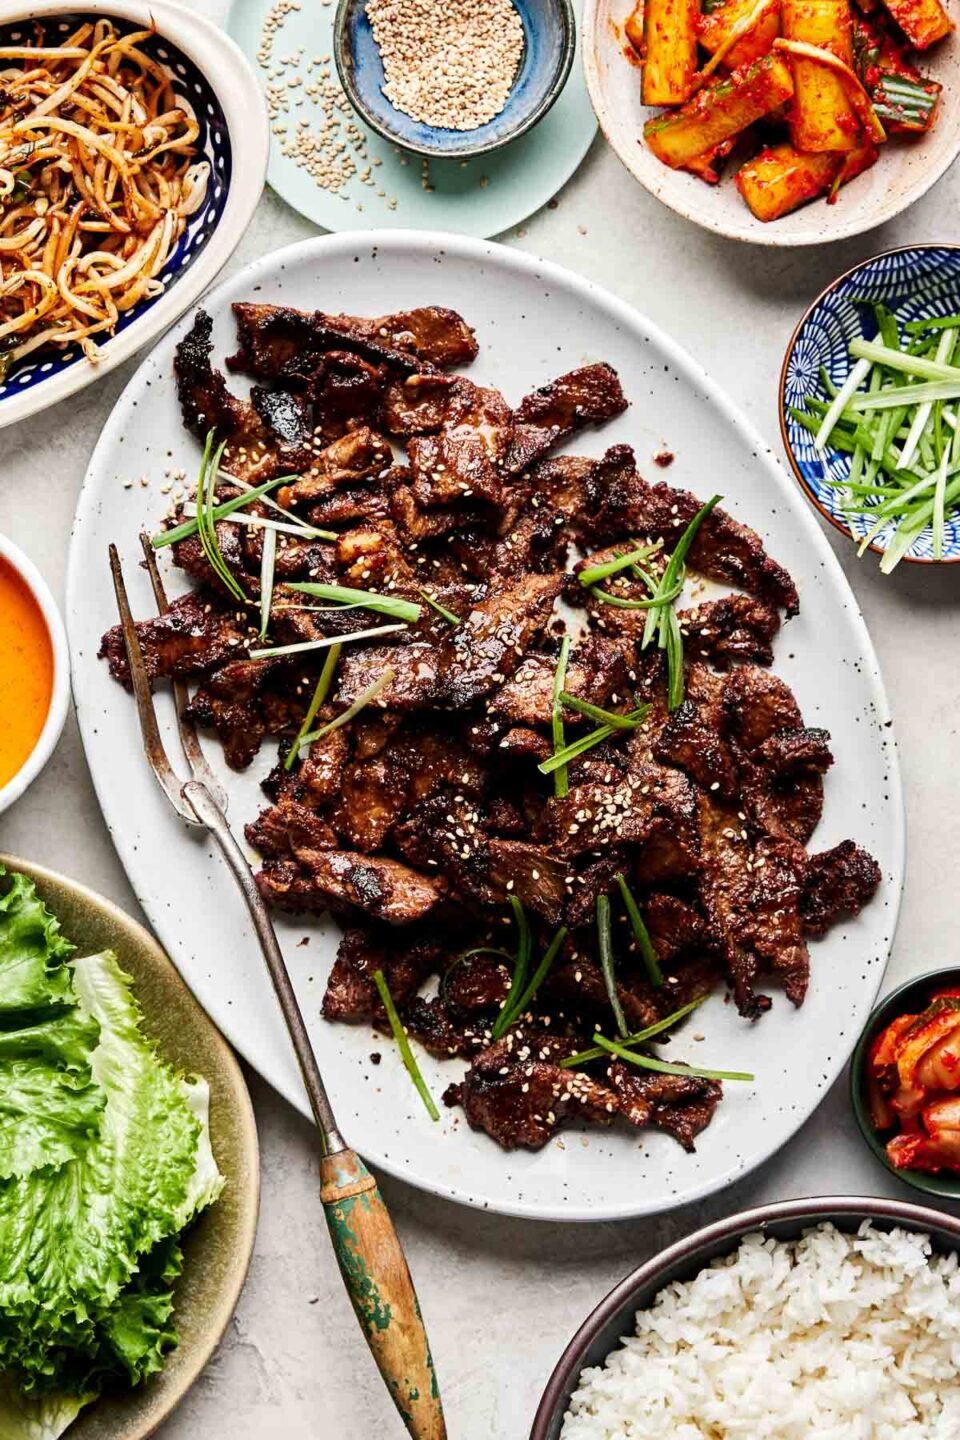
At this point, all that’s left is the fun part—digging in!
Serve your beef bulgogi with banchan, just like your favorite KBBQ. These assorted sides can add fresh, tangy, or spicy flavor—truly whatever you love. I always reach for a side of cabbage kimchi (or Mom’s Quick Cucumber Kimchi!), pickled radish, and fresh napa cabbage.
To me, a bulgogi dinner is also not complete without a pile of sticky white rice. Rice is an absolute staple at my family’s dinner table—it’s perfect for soaking up all the savory-sweet flavors of the meat.
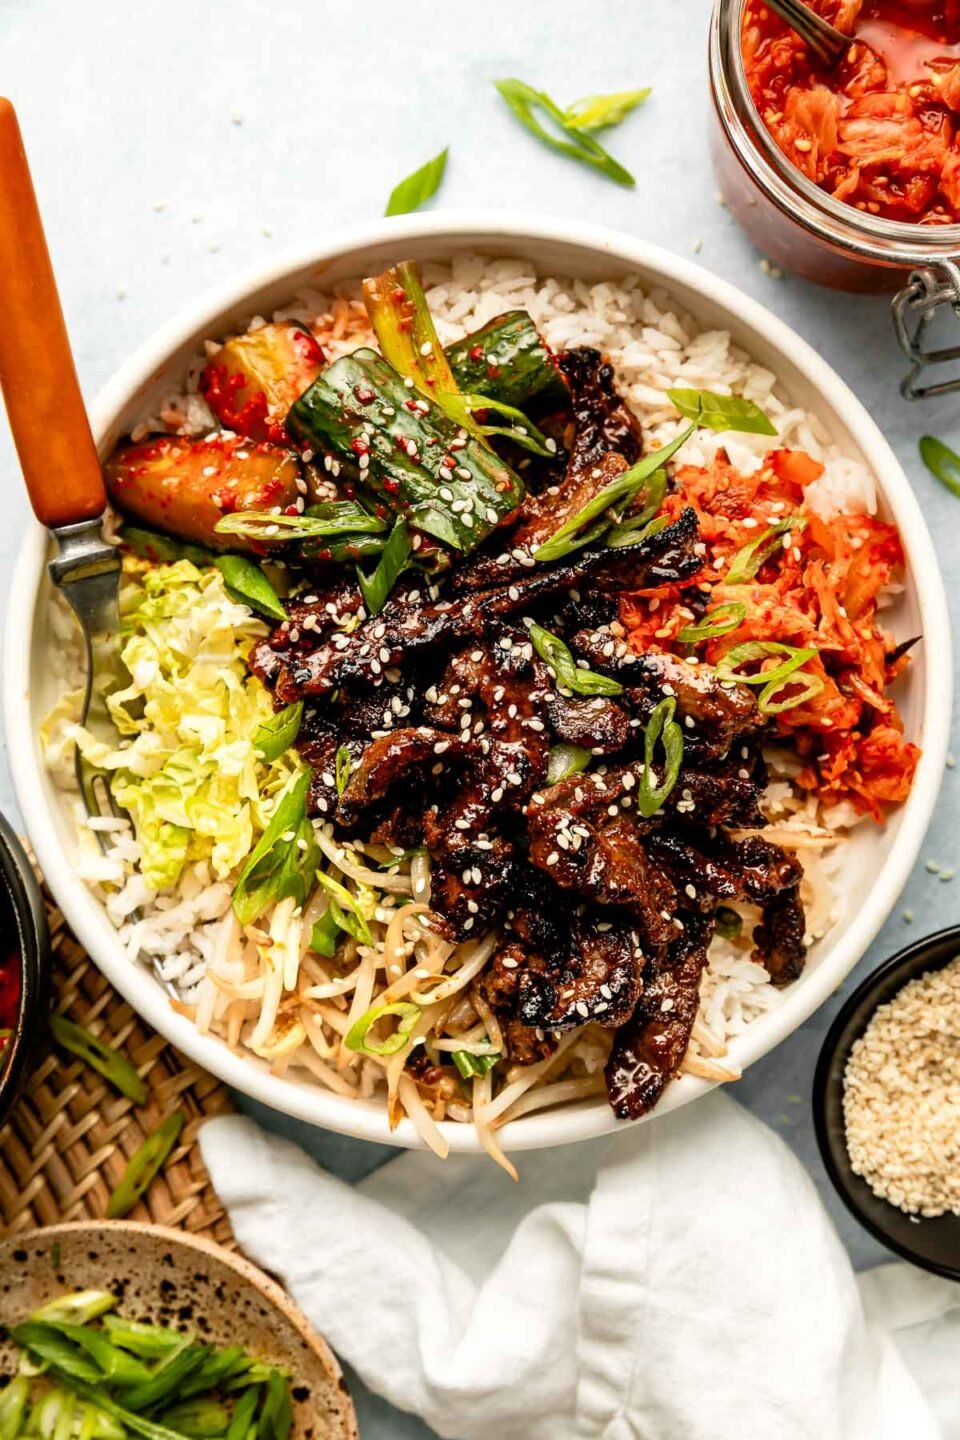
Easy Weeknight Dinner Idea
Make it a bowl! Toss it all together—the bulgogi beef, rice, kimchi, and a quick sauce like my favorite gochujang aioli—to make Beef Bulgogi Rice Bowls. The perfect dinner bowl for any night of the week!
I can’t wait for you to try Mom’s Beef Bulgogi! If you do, be sure to let us know! Leave a comment with a star rating below. You can also snap a photo and tag @playswellwithbutter on Instagram. We LOVE seeing your PWWB creations! ♡ Happy cooking!
Print
Korean BBQ-Style Beef Bulgogi At Home (Tender & Charred!)
- Prep Time: 20 minutes
- Inactive Marinating Time: 12 hours
- Cook Time: 15 minutes
- Total Time: 12 hours 35 minutes
- Yield: serves 4-6 1x
- Category: Main Dishes
- Method: Stovetop, Broiled
- Cuisine: American, Korean-inpsired
Description
Going out to eat at a Korean BBQ restaurant is one of my family’s favorite ways to share a special meal together. But since there aren’t a ton of KBBQ options near us, my mom and I set out to recreate the experience at home.
We tested a variety of different methods and found that the secret to making KBBQ-style tender, caramelized, and deeply charred beef bulgogi without a grill or hot plate is pretty simple—quickly sear the marinated steak in a skillet, then finish it under the broiler in your oven!
For best results with this recipe, use a tender cut of steak (like ribeye or sirloin), marinate it at least 12 hours so all the flavors sink into the meat, and cook in batches to create a beautiful golden sear.
Ingredients
- 2 pounds ribeye or tender steak of choice, thinly sliced against the grain into ⅛-inch strips (see Recipe Notes)
- bulgogi marinade (below)
- 1–2 tablespoons vegetable oil of choice
- 8 ounces fresh mung bean sprouts
- 2 green onions, thinly sliced
- for serving, as desired: cooked white rice, leafy lettuce, kimchi or pickled vegetables of choice (try Mom’s Quick Cucumber Kimchi), gochujang aioli, toasted sesame seeds, etc.
for the bulgogi marinade:
- ½ cup shoyu (can substitute low-sodium soy sauce or tamari)
- ⅓ cup lightly packed dark brown sugar (can substitute light brown sugar)
- 2 tablespoons mirin or rice wine of choice
- 2 tablespoons toasted sesame oil
- 1 tablespoon gochujang
- 4 cloves garlic
- 1 small Asian pear, peeled, cored, and roughly chopped (can substitute Pink Lady apple or Bosc pear)
- 1 small yellow onion, peeled and roughly chopped
- 1-inch piece fresh ginger, peeled and roughly chopped
- kosher salt and ground black pepper, to season
Instructions
- Prepare the bulgogi marinade: To a blender or food processor, combine all listed bulgogi marinade ingredients. Season with 1 teaspoon kosher salt and ground black pepper as desired. Blend or pulse to combine well. (Alternately, you can use a box grater to finely grate the pear, onion, and ginger, then whisk with remaining ingredients in a large bowl.) Learn more! ⇢ Grandma Marian’s Bulgogi Marinade Recipe.

- Marinate the steak: Place the thinly sliced steak in a large bowl or resealable plastic bag. Pour the prepared bulgogi marinade over top. Toss well to combine, using your hands to separate the steak and ensure each individual piece is well coated. Cover and marinate in the refrigerator for at least 12 hours or up to 3 days.
- Dinner prep: About 1 hour or 30 minutes before cooking, remove the marinated bulgogi beef from the refrigerator and allow to warm slightly. Just before cooking, line a large baking sheet with aluminum foil for easy clean up and set aside. Preheat your oven’s broiler to its highest setting, ensuring a rack is positioned directly underneath it.
- Sear the bulgogi beef: Add 1 tablespoon of oil to a large skillet over medium-high heat. Once the oil is hot and shimmering, begin searing the beef in batches. I like to grab a small handful (allow any excess marinade to drip back into the bowl) and carefully place it into the skillet, spreading it into an even layer. Do not over-crowd the pan. Cook for 1 minute, then flip and cook for 30 seconds more. Transfer to the prepared baking sheet. Continue to sear the remaining bulgogi beef in batches, adding additional oil to the pan as needed. Discard any remaining marinade.
- Finish under the broiler: Once all of the beef is seared, transfer the sheet pan to the oven, placing it directly under the broiler. Broil 2-3 minutes, carefully rotating the pan halfway through, until the beef bulgogi is browned and slightly crisp. Remove from the oven and set aside for serving.
- Cook the mung bean sprouts: Meanwhile, as the bulgogi beef broils, quickly cook the mung bean sprouts. Return the skillet used to sear the beef to medium-high heat. Add the bean sprouts and green onions. Season with a good pinch of salt and ground black pepper as desired. Cook until just warmed through, using a wooden spoon to scrape up any of the flavorful browned bits from the bottom of the pan. Do not overcook; the crispy sprouts have wonderful texture!
- Serve immediately as desired. I love serving this beef bulgogi with a spread of cooked rice, leafy lettuce, and banchans like the softened bean sprouts and kimchi. It’s also fabulous in a Beef Bulgogi Bowl or tucked into tacos (completely untraditional but absolutely delicious!). Enjoy!


Notes
Jess’ Tips and Tricks
- Best cut of beef to use, plus prep tips: As written, this bulgogi recipe works best with tender steak. We love ribeye most, but top sirloin is also a great, slightly more affordable cut. Thinly slicing raw steak can be tricky. I suggest placing the steak in the freezer for about 30 minutes – 1 hour; the meat firms up quite a bit as it chills, making it much easier to slice. If you live near a great Asian grocery store, they may also sell thinly sliced beef for bulgogi—feel free to use it for this recipe!
- Gochujang is a fermented Korean chili paste made from red chili flakes (gochugaru), fermented soy beans, and glutinous rice. It has a distinctive spicy-sweet-funky umami flavor. Gochujang is readily available at Asian grocery stores (often packaged in a red plastic tub), though you can often find it in the “international” aisle of a conventional grocery stores or online. The brands I typically use are Chung Jung One and Mother-In-Law.
- Rice wine: You can find rice wine in the “international” aisle of most conventional grocery stores these days, though it’s also readily available at Asian grocery stores. Imperfect-yet-quick substitutes for mirin in this recipe include dry sherry or dry vermouth.
Storage and Reheating
Store leftover bulgogi beef in an airtight container in the refrigerator for up to 3 days. Reheat on the stovetop or in the microwave until warmed through, then serve as desired.

Follow along with Plays Well With Butter on Instagram, YouTube, Facebook, and Pinterest for more unfussy recipes that pack a big punch of flavor!


Oh! I forgot to mention that I added a Quince, instead of a pear or apple, to the marinade and it was great in the marinade!
That sounds absolutely delicious, Kathy!! Happy to hear it worked well for the marinade!
I used this to marinate steaks and then grilled them. They are soooo delicious!
So glad you loved the marinade, Kathy!