
Description
These Crispy Roasted Mushrooms with Garlic & Parmesan are the seriously the BEST mushrooms you’ll ever eat – tender but seriously crispy & golden brown, & tossed with garlic butter & fresh herbs for next-level flavor.
The secret lies in roasting the mushrooms in 3 phases in a screaming hot oven. A quick initial roast on a preheated baking sheet browns the mushrooms instantly, while seasoning them with salt & aromatics part way through yields an especially flavor-forward result.
As far as seasoning goes, I like to keep things classic, using butter, garlic, & fresh herbs, but a quick spritz of lemon juice brings all the flavors to life & showering the roasted mushrooms with parmesan makes them eat-straight-off-the-pan delicious. Feel free to take your seasonings in a different direction based on whatever you plan to serve your mushrooms with – swap lemon for soy sauce or balsamic vinegar, swap the fresh herbs with your favorite dried seasoning, or skip the cheese & sprinkle fresh chives or parsley over top!
Lastly, a noteworthy tip – while roasting mushrooms in the oven is especially convenient & hands-off, pan-roasting them on the stovetop in a heavy-bottomed skillet (e.g. cast iron) is just as effective. I’ll use either method based on what else is happening in my kitchen at the time. Check out the Recipe Notes, below, for more info!
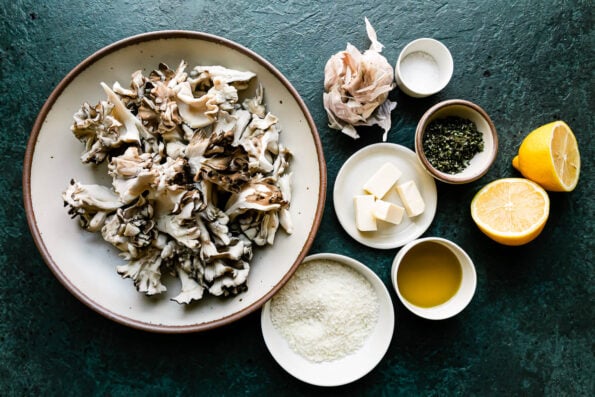
Ingredients
- 16 ounces maitake mushrooms or mushrooms of choice, torn or sliced into hearty bite-sized pieces (see Recipe Notes)
- 3 tablespoons olive oil
- 1 heaping teaspoon kosher salt
- 2 tablespoons unsalted butter, diced into 3-4 small pieces
- 1 tablespoon finely chopped hardy fresh herbs (rosemary, thyme, sage, oregano, etc.)
- 6 cloves garlic, finely chopped or grated
- 1 lemon, juiced
- ¼ cup finely grated parmesan
Instructions
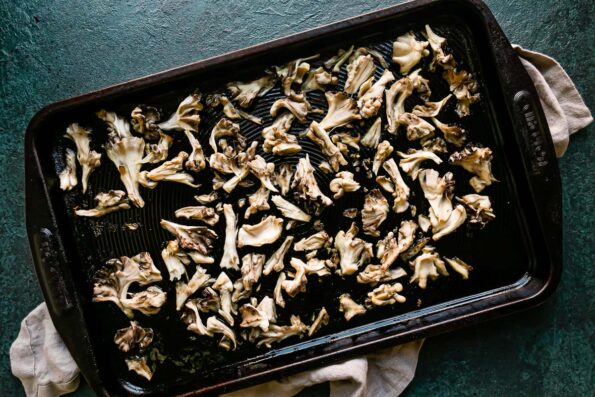
- Prep: Place a rimmed half sheet pan on a rack positioned in the upper third of the oven. Preheat the oven (with the sheet pan in it) to 450 degrees F. Meanwhile, as the oven preheats, it’s a great time to prep ingredients according to the Ingredients List, above – e.g., tear/slice the mushrooms, finely chop the herbs & garlic, etc. Set everything within arm’s reach of the oven.
- Phase 1 – Roast the mushrooms: Working quickly & carefully, remove the hot sheet pan from the oven. Place the olive oil on the sheet pan, shaking to coat the surface. Place the mushrooms over top, shaking them into a single, uniform layer – the mushrooms should sizzle as soon as they hit the hot pan. Transfer the sheet pan to the oven & roast for 10 minutes.
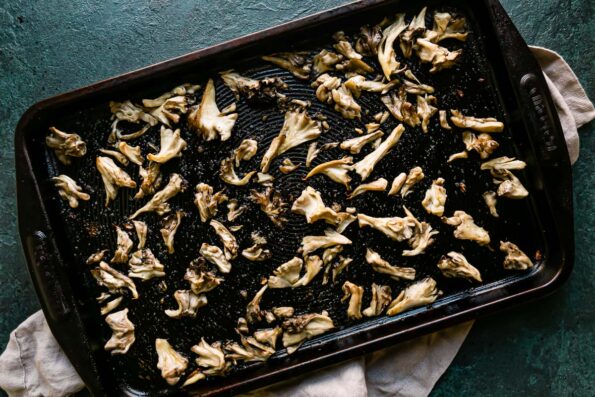
- Phase 2 – Roast the mushrooms: After the 10 minutes have passed, remove the sheet pan from the oven. The mushrooms should start to look golden & crisp at this point. Season the mushrooms with the kosher salt, shaking to coat well, then arrange them into single, uniform layer again. Return to the oven to roast for 5 more minutes.
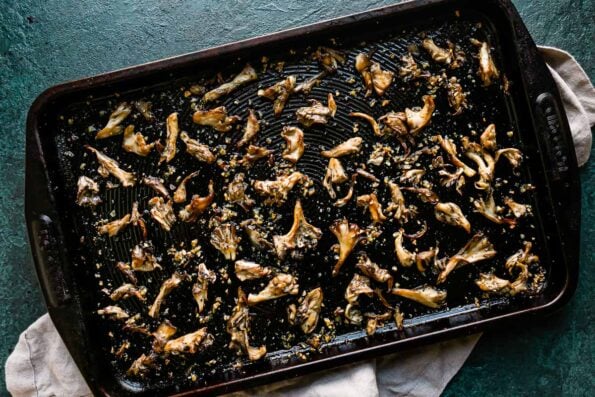
- Phase 3 – Roast the mushrooms: After the next 5 minutes have passed, remove the sheet pan from the oven. Give the mushrooms another good shake to ensure they brown evenly. Place the butter in an empty space near the center of the pan – it should start to melt almost immediately. Place the fresh herbs & garlic over top. Return to the oven to roast for 3-5 more minutes, until the mushrooms are as tender/crisp as you like.
- Finishing touches: Remove the sheet pan from the oven & shake/stir to coat the mushrooms well in the butter, garlic, & herbs. Squeeze lemon juice over top, then finish with the parmesan cheese. Enjoy immediately – these crispy mushrooms are a great add-on to a simple Brown Butter Pasta, Wild Mushroom Ragu sauce, or Mushroom Risotto. They’re also a fantastic simple side dish for any dinner, like Cast Iron Steak, Creamy Pork Marsala, or Individual Beef Wellington. (That is, if you don’t eat them all straight off the pan – yes, they’re that good!) Enjoy!

Notes
- Ingredient Notes:
- Best mushrooms to roast in the oven: Since they’re the star of this simple dish, I like to splurge for really beautiful wild mushrooms – maitake (pictured), oyster, chanterelle, & king trumpet mushrooms are all great because you can tear them into beautiful hearty pieces. You can also definitely use a more cost-effective mushroom, like simple white button mushrooms or cremini (baby bella) mushrooms. Use what you love most or what’s most readily available to you.
- Cleaning & storing fresh mushrooms: Whenever I bring home fresh mushrooms from the store, I like to trim & clean them immediately. I pat them dry with paper towels, then layer them in a large bowl & place them in the refrigerator, uncovered. Prepared & stored in this manner, the mushrooms will still be beautiful after 3-5 days.
- Vegetarian &/or vegan roasted mushrooms: This oven roasted mushrooms recipe is naturally meatless. For a vegetarian version, omit the parmesan or use your favorite rennet-free parmesan. To take it a step further & make it vegan, opt for your favorite non-dairy parmesan & use your favorite plant butter.
- Alternate Cooking Method – Pan-Roasted Mushrooms: If you prefer, you can also make deliciously crisp pan-roasted mushrooms on the stovetop using a heavy-bottomed pan such as a cast iron skillet. Here’s what you’ll do:
- Add the olive oil to a large, heavy-bottomed skillet over medium-high heat.
- Once hot & shimmering, add the mushrooms. Stir to coat then cook, stirring occasionally, until deeply browned & golden, about 12-15 minutes. At about the 10 minute mark, season the mushrooms with the kosher salt & ground black pepper as desired.
- Just before the mushrooms are ready, add the butter, herbs, & garlic to the skillet. Cook 1-2 minutes longer, tossing to coat the mushrooms in the garlic herb butter.
- Remove from the heat & finish with lemon juice & parmesan, as directed in Step 5 of Recipe Directions, above.
- Storage & Reheating: While these roasted mushrooms are best enjoyed fresh, you can transfer any leftovers to an airtight container & store in the refrigerator for up to 5 days. Simply reheat in the microwave or on the stovetop until warmed through.