
Description
How to grill pizza without any special equipment or tools using the 2-Zone Method – the BEST grilled pizza recipe! Using both direct & indirect heat to creates homemade pizza on the grill that has gooey-melty cheese, smoky flavor, & a crisp, golden brown crust that’s not burnt on the bottom.
Refer to the blog post, above, for even more pizza night tips & inspiration for all kinds of grilled pizza toppings!
Ingredients
Scale
- 1 17.6-ounce DeLallo Pizza Dough Kit
- kosher salt
- 1 1/4 cups warm water
- 1/4 cup DeLallo Extra Virgin Olive Oil, divided
- toppings of choice: DeLallo Pizzeria-Style Pizza Sauce, freshly shredded cheese, sausage, pepperoni, veggies, etc.
- for serving, as desired: grated parmesan, crushed red pepper flakes, etc.
Instructions
- Prepare the pizza dough kit: At least 1 hour before you’d like to start grilling pizza, prepare the DeLallo Pizza Dough Kit according to package directions: combine the kit contents in a large bowl, seasoning with a pinch of salt. Add in the warm water, stirring until the dough begins to come together. The mixture will be very shaggy & wet. Turn it out on to a lightly floured surface. Knead until the dough comes together in a soft & smooth ball, 2-3 minutes. Transfer the dough to a lightly greased mixing bowl. Cover the bowl with a kitchen towel & set it in a warm place in your kitchen to rise until the dough has doubled in size, about 1 hour.

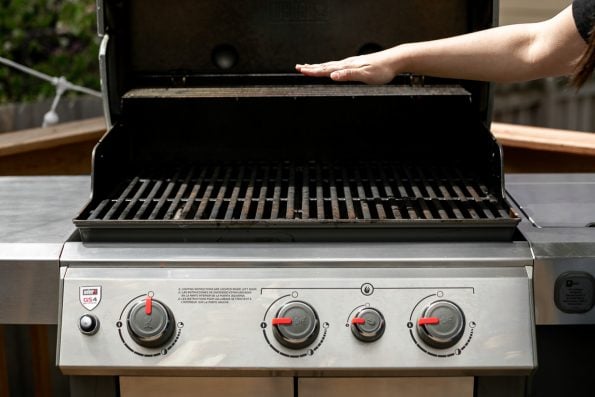
- Preheat the grill: Prepare your grill for indirect cooking, creating a zone of direct high heat & a second zone of indirect heat. If using a gas grill, begin preheating at least 15 minutes before grilling. If using charcoal, light the charcoal at least 30 minutes prior to grilling. (To learn more about zone grilling, be sure to check out this post.)
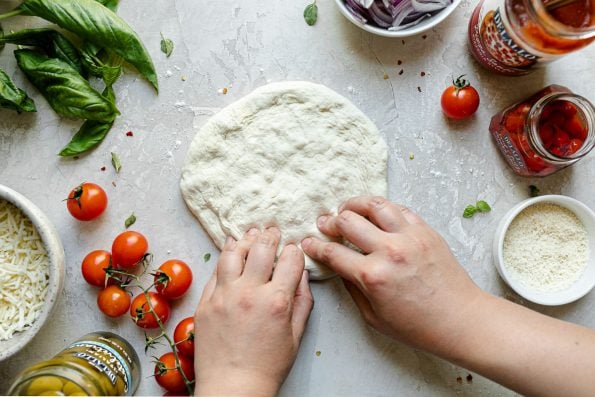
- Prepare the crust: Using a knife or a bench scraper, divide the dough into 3 equal pieces (each approx. 8-10 ounces). Form each piece of dough into a ball, tucking the edges back into the center of itself until a smooth ball forms. Set aside to proof for 5-10 minutes. Roll the dough balls into 10-inch rounds. Lightly brush one side of the prepared crusts with olive oil. See Recipe Notes, below, for tips for rolling out pizza dough & pizza dough storage.
- Par-grill the crust: Working 1 crust at a time, set the crust, oiled side down, on the direct heat side of the grill. Close the lid & grill 2-3 minutes. The side of the dough facing up should be slightly puffy with air bubbles, & the side of the dough on the grill grates should be golden brown with nice grill marks. Remove the dough from the grill. If desired, repeat with the remaining prepared crusts. It’s helpful to wait 2ish minutes between crusts to give the grill grates a chance to heat back up. [gallery columns="2" size="full" ids="18731,18734"]
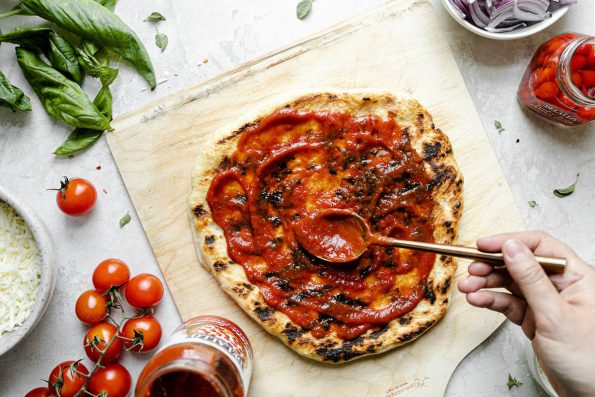
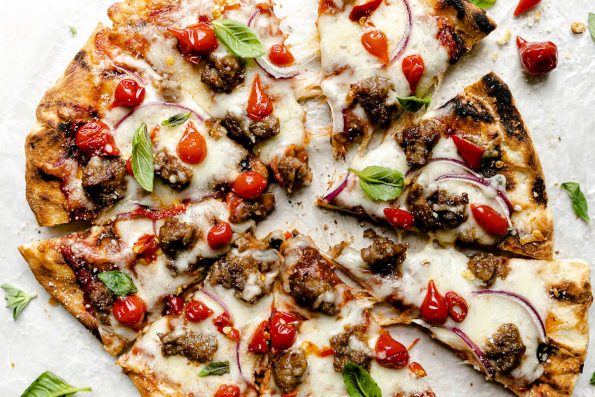
- Assemble the pizza: Transfer the par-grilled crust to a work station – it’s helpful to assemble the pizza on a pizza peel (or cutting board, or something similar) to transfer to the grill with ease. Lightly brush the ungrilled side of the par-grilled crust with olive oil, then flip the crust such that the grilled side is facing up. Assemble your pizza, placing sauce, cheese, & toppings of choice on the grilled side of the par-grilled crust. I typically do 1/4 cup sauce, 1/2 cup cheese, & 2-3 toppings per pizza. See blog post, above, for tons of toppings ideas! Remember, when it comes to pizza, it’s important not to go overboard with toppings because otherwise the pizza won’t cook properly.
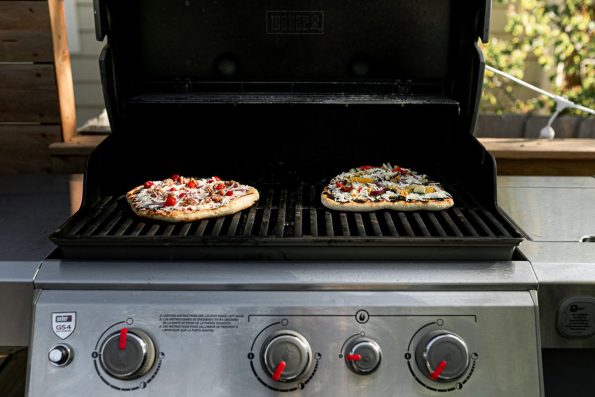
- Grill the pizza: Working 1 pizza at a time, transfer the pizza, toppings facing up/oiled side facing down, to the direct heat side of the grill. Close the lid & grill 2-3 minutes. Once the bottom of the crust is golden brown with nice grill marks, carefully transfer the pizza to the indirect heat side of the grill to finish cooking. Close the lid & grill 5 minutes, rotating the pizza halfway through, until the cheese is melted & the toppings are warm. Carefully remove from the grill.
[gallery columns="2" size="full" ids="18742,18744"]
- Serve: Slice the grilled pizza & serve immediately. Enjoy!


Notes
- PWWB’s Grilled Pizza Golden Ratio: For an 8-10-inch grilled pizza, aim for 1/4 cup sauce, 1/3 cup freshly shredded cheese, & a limit of 2-3 toppings per pizza.
- Pizza dough tips & tricks for success:
- Rolling out pizza dough: Lightly dusting your work surface with flour to help prevent any sticking. Use your palm to press down the center of your dough ball, creating a disc. Using your fingers, work the dough at the center of the disc out towards the edge, making the disc larger & larger. Once your dough is about halfway there, pick it up. Holding the dough by its edge, rotate the dough as though you’re turning a steering wheel. Gravity will help stretch the dough into a larger round.
- Stubborn dough: If at any point your dough isn’t really working with you & it’s snapping back into the same shape/size despite working at it, the best thing you can do is give it a minute or two to breathe. The stubborn proteins holding the dough together just need a minute to relax – how high-maintenance of them, ha! Let the dough rest (ahem, pour yourself a glass of wine while you’re at it!) & try again in a couple of minutes – should be much easier!
- Holes in the crust: If a hole or two shows up when you’re rolling out your dough, that’s totally fine. Use your fingers to pinch it closed. Problem solved!
- Make-ahead pizza dough: You can prep fresh pizza dough up to 3 days in advance. Divide the dough into individual dough balls according to Step 3 of Recipe Directions, above. Rather than proofing & rolling out the dough, transfer to an airtight container. Store in the refrigerator for up to 3 days. To use, let the dough balls come up to room temperature & proof for about 30 minutes before rolling out the dough.