
Description
I’ve been obsessed with sushi stacks ever since they took the internet by storm a few years back, & these Spicy Tuna Sushi Stacks are my favorite version to date!
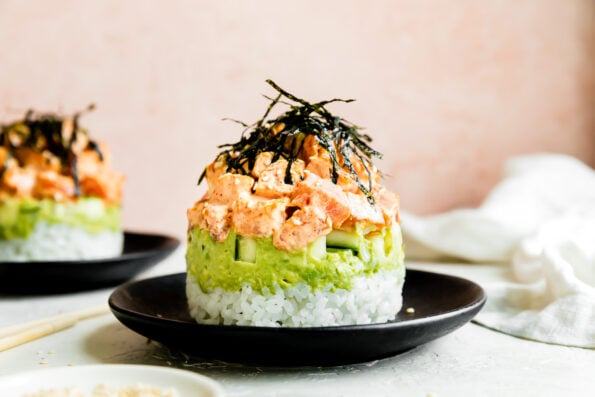
With gorgeous layers of seasoned sushi rice, avocado, cucumber, & creamy spicy ahi tuna, the flavors & textures of each sushi stack tastes just like a classic spicy tuna roll – all with the bonus that layering the ingredients (rather than wrapping them into maki rolls or hand rolls) makes things a whole lot easier.
A couple of quick notes to keep in mind:
- Sushi stacks are wonderfully versatile. If you don’t like tuna, swap it with salmon. If you prefer fully-cooked seafood, use imitation crab or cooked shrimp. You really can’t go wrong, & that’s half the fun – check the blog post, above, for more easy recipe variations!
- The sushi rice recipe below comes straight from my Japanese Great Grandma Yoshida’s kitchen. It’s perfectly tangy with not too much sweetness, & you can use it to season either short-grain sushi rice or medium-grain sticky white rice. Check the Recipe Notes, below, for family’s preferred brands.
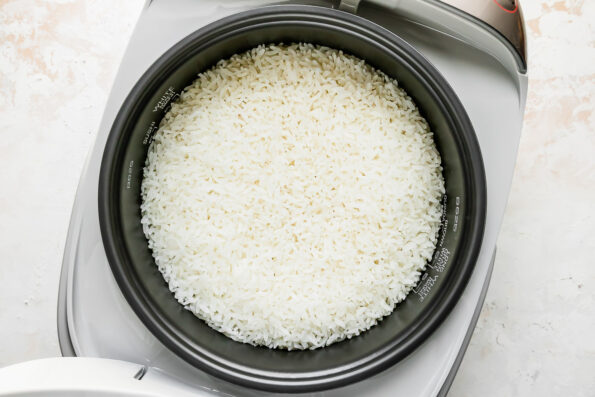
- Properly prepping & cooking the rice is key to creating restaurant-worthy sushi rice at home. Using a quality rice cooker – like my favorite, the Zojirushi Micom Rice Cooker & Warmer NS-TSC10A pictured throughout this post – makes things a lot easier. Be sure to rinse your rice well, & let the rice cooker do the rest of the work!
Guaranteed to impress on any occasion, I hope you have so much fun making sushi stacks! Happy stacking! ♡
Ingredients
Scale
- sushi rice, below
- spicy tuna, below
- avocado mash (mash together 1 avocado + juice of ½ lemon + ½ teaspoon toasted sesame oil)
- ½ English cucumber, peeled if desired & diced into ¼-inch cubes (roughly ½ cup diced)
- for serving: toasted sesame seeds & nori seaweed, sliced into thin strips
for the sushi rice:
- ¾ cup Calrose rice, rinsed well (see Recipe Notes)
- ¼ cup Japanese rice vinegar
- 1 teaspoon mirin or sake (see Recipe Notes)
- 2-3 tablespoons white sugar
- 1 teaspoon kosher salt
- optional: ½ teaspoon msg
for the spicy tuna:
- 1 pound sashimi-grade ahi tuna, diced into ¼-inch cubes (see Recipe Notes)
- ¼ cup mayonnaise (Japanese-style, such as Kewpie, preferred)
- 1 heaping tablespoon sriracha
- 1 teaspoon soy sauce
- ½ teaspoon toasted sesame oil
- ¼ teaspoon white pepper
Instructions
- Rinse the rice: Using the measuring scoop that comes with the Zojirushi Micom Rice Cooker, measure & level 1 scoop of rice (approx. 6 ounces or ¾ cup rice if using standard English measuring cup). Transfer the rice to the rice cooker’s inner cooking pan. To rinse the rice, cover the rice with warm water, give it a good jostle with your hands to agitate the dust off the rice’s surface, then carefully drain the water. Repeat rinsing until the water runs clear – this takes a good minute or two; be patient! [gallery columns="2" size="full" ids="36841,36843"]
- Cook the rice: Following the ratios provided in manufacturer’s directions, add water to the inner cooking pan. Place the inner cooking pan into the rice cooker & cook according to manufacturer’s directions. Once the rice is done, let it steam & rest for 5-10 minutes before seasoning the sushi rice.
- Season the sushi rice: Meanwhile, as the rice cooks, prepare the seasoning. Combine the Japanese rice vinegar, mirin, white sugar, salt, & msg (if using) in a small saucepan over medium-high heat. Bring the mixture to a boil & cook until the sugar is dissolved. Remove from the heat & set aside to cool. Once the rice is cooked, use a plastic rice paddle to transfer it to a shallow pan. Be sure to use the paddle to scrape the rice out of the pot rather than digging it – doing so compacts the rice & we want our sushi rice to be nice & light! Working a few spoonfuls at a time, add the prepared seasoning liquid to the rice & use the rice paddle to gently toss the seasoning throughout the rice. Use only enough seasoning to flavor the rice to taste – too much seasoning will cause the rice to be wet & mushy. You will likely have leftover seasoning, which is fine – save it for later use. Once seasoned, set the sushi rice aside for sushi stack assembly.

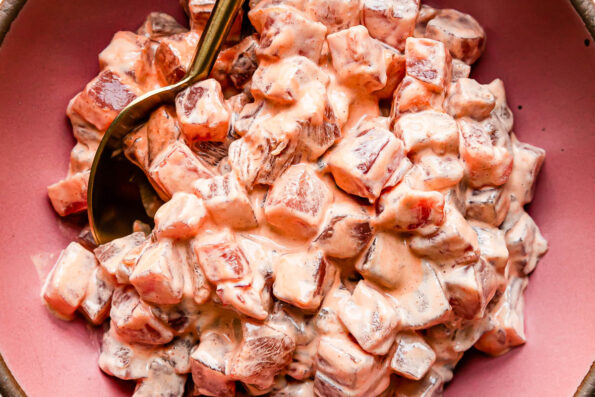
- Prepare the spicy tuna: Meanwhile, as the rice cooks, prepare the spicy tuna. To a medium bowl, add the mayonnaise, sriracha, soy sauce, toasted sesame oil, & white pepper. Mix to combine well. Add the cubed tuna then gently stir to coat well. Set aside for sushi stack assembly.
- Assemble the sushi stacks: Place a sushi stack mold on a serving plate or prepared surface. Gently add about ½ cup of the seasoned sushi rice into the mold, using a fork to spread it into an even layer without pressing down on the rice. Gently spread 1 heaping tablespoon smashed avocado over top, then layer on 1 heaping tablespoon of diced cucumber. Finish with 2 heaping tablespoons of spicy tuna, using a fork to spread it into an even layer. Use the press to lightly press down on the tuna &, at the same time, slide the ring up & off, revealing a beautifully layered sushi stack. Rinse the sushi stack mold, then repeat with remaining ingredients, building 4-6 sushi stacks in total. (Helpful tips! ⇢ To prevent sticking as you work, it’s helpful to rinse your utensils with a little water between uses, shaking off any excess moisture. To create really uniform, even layers, it’s also helpful to gently press down on the layers as you go – again, take care not to press down too forcefully, as it smashes the delicate ingredients.) [gallery columns="2" size="full" ids="36830,36832,36834,36836"]
- Serving: Once the sushi stacks are assembled, give them a couple of finishing touches: top each stack with a final heaping tablespoon of the spicy tuna, then finish with a haystack of thinly sliced nori seaweed & a generous sprinkle of toasted sesame seeds. Serve immediately. Enjoy!


Notes
- Ingredient & Equipment Notes:
- Best rice for sushi rice: For best results, use either short-grain or medium-grain white rice for your sushi stacks. While sushi-style short-grain white rice works beautifully, my family is partial to Calrose-style medium-grain white rice (preferred brands: Botan & Kokuho Rose, though Hinode & Nishiki are great too).
- Best fish for sushi stacks: As the star of any sushi recipe, it’s important to use the best quality fish you can find. Since this recipe calls for a raw preparation, it’s also important to source your fish from somewhere you trust. While some swear by using only “sushi-grade” or “sashimi-grade” fish, these designations aren’t regulated – this is an interesting read on the matter. Rather than focusing on specific labels, I suggest heading to your local fishmonger & letting them guide you in the right direction. If you’re local to the Twin Cities Metro, I am a big fan of Coastal Seafoods – they have storefronts in both Minneapolis & St. Paul.
- Tuna substitutes: This is a great base recipe, so if you cannot find ahi tuna, feel free to swap it for salmon or whatever looks best at the fish counter. If you prefer to use fully cooked seafood, poached shrimp or imitation crab can be chopped & mixed with the spicy mayo. You could also top your sushi stacks with tempura shrimp or teryiaki salmon instead, drizzling the spicy mayo over top. Have fun with it!
- Sushi stack mold: We use this handy sushi stack mold, which is readily available online. You can also build sushi stacks using a ring mold or a standard English 1 cup measure. If using a measuring cup, be sure to lightly spray it with nonstick cooking spray first, then add the ingredients in reverse order (start with spicy tuna & finish with rice).
- Storage: Once assembled, sushi stacks are best enjoyed immediately – though you can cover them in plastic wrap & store them in the refrigerator for 1-2 hours before serving. Store any leftover components in separate airtight containers in the refrigerator for no more than 1 day. Reheat the rice in the microwave, then create a sushi bowl or build stacks (if desired).