
Description
To me, prepping a perfect turkey gravy is Thanksgiving’s most intimidating to-dos. Gravy is a non-negotiable for most holiday menus, but tradition dictates that we wait to make it in the last 30 minutes before sitting down for dinner. So much pressure for one little dish!
That’s exactly why I love preparing gravy ahead of time!
It’s a simple roux-based gravy infused with plenty of butter and aromatic fresh herbs to create amazing homemade flavor and silky-smooth texture. Prep it up to 5 days in advance, reheating it just before dinnertime with or without turkey drippings.
This gravy is flavorful, luscious, and its classic flavors are the perfect pair for pretty much anything on your turkey dinner table – we’re pretty sure everyone at your Thanksgiving, Friendsgiving, or holiday meal will love it!
Be sure to check out the blog post, above, for plenty more tips and tricks, and if you love the idea of a make-ahead Thanksgiving, be sure to check out our complete Make-Ahead Thanksgiving guide. ♡ Happy holidays!
Ingredients
- ½ cup unsalted butter (1 stick, 8 tablespoons), diced into tablespoon-sized cubes
- 1 ½ teaspoons finely chopped fresh sage (or ½ teaspoon dried sage)
- ¾ teaspoon finely chopped fresh thyme (or ¼ teaspoon dried thyme)
- ½ teaspoon finely chopped fresh rosemary (or pinch dried rosemary)
- ½ ground black pepper
- 1 teaspoon turkey base (can substitute chicken base)
- ½ cup all-purpose flour
- 4 cups low-sodium turkey broth (can substitute chicken broth)
- kosher salt, to season
- for reheating: roasted turkey drippings or roasted chicken drippings (see Recipe Notes)
- for reheating: ½ cups low-sodium turkey broth (can substitute chicken broth)
Instructions
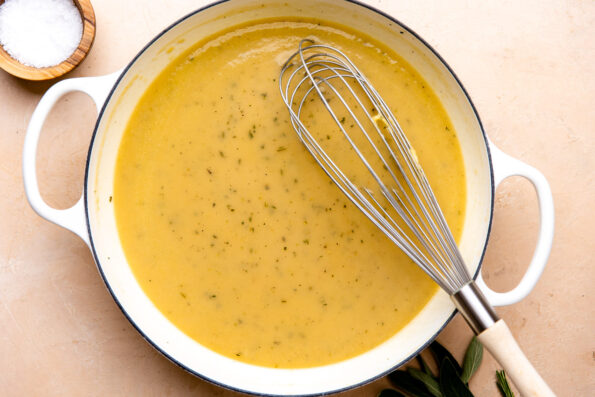
- Prepare the roux: Add the butter to a large saucepan over medium heat. Once melted, sprinkle the fresh herbs and ground black pepper over top, letting them sizzle and bloom in the butter until fragrant, about 30 seconds. Add the turkey base and flour to the pan, whisking vigorously to eliminate any lumps in the roux. Cook the roux for 1-2 minutes, stirring constantly, until golden brown.

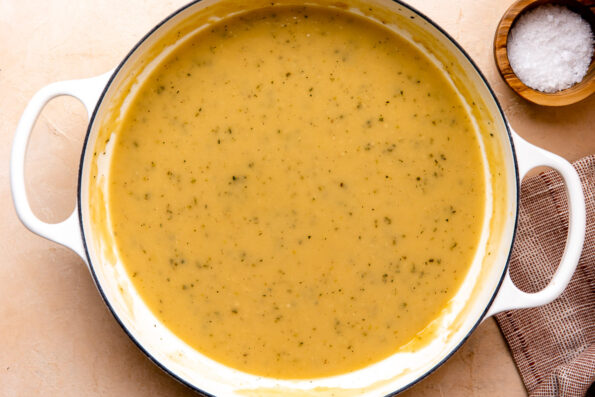
- Build the gravy: Slowly add the turkey broth into the pan, whisking constantly to eliminate any lumps in the roux. Cook 3-4 minutes, stirring occasionally, until the sauce has thickened to the point that it coats the back of a spoon (nappe). Reduce heat to medium-low and, while stirring occasionally, let the gravy simmer for 3-4 minutes longer, until thickened. Season with kosher salt to taste. Remove from the heat and allow to cool completely.
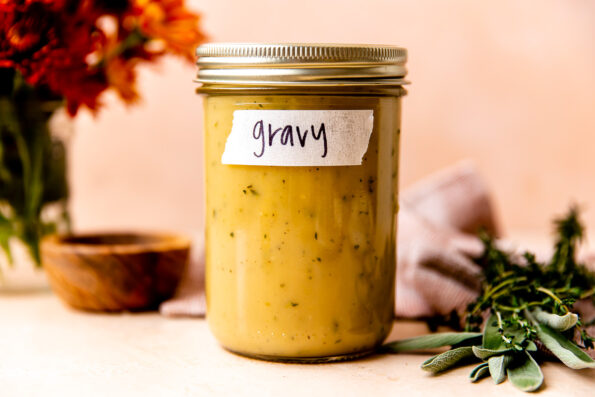
- Store for later: Once cooled, transfer the prepared gravy to a large airtight container or jar. We like to use a quart-sized mason jar to save space in the refrigerator during busy holiday weeks. Store in the refrigerator for up to 5 days.
- Reheating: Transfer the make-ahead gravy to a large saucepan. Reheat over medium-low heat, whisking often, until warmed through, about 5-8 minutes. Meanwhile, as the gravy reheats prepare the drippings. If you have roasted a chicken or turkey, transfer the drippings from the roasting pan to a large liquid measuring cup. Use a spoon to skim off most of the fat and discard. (If your chicken or turkey is butter roasted, there will be a lot of fat – leave some of it in for flavor, but you definitely don’t need it all for a rich gravy!) Stir the drippings into the warm gravy for added color and flavor. If needed, whisk in the remaining ¼ – ½ cup turkey or chicken broth until desired consistency is reached. Taste and season with additional kosher salt and ground black pepper as desired.
- Serving: Reduce the heat to low to keep the gravy warm until you are ready to serve, stirring occasionally to prevent burning. If a film forms at the surface just give it a good whisk and it will incorporate back into the gravy in no time. Transfer to a gravy boat and serve alongside your roast turkey or roast chicken, mashed potatoes, and stuffing. Enjoy!


Notes
- Make ahead gravy without drippings: If you are preparing gravy without drippings, feel free to add in up to 2 teaspoons of Kitchen Bouquet Browning and Seasoning, which adds both rich flavor and color to the gravy. If you prefer not to use an additional product, your make ahead gravy will still be delicious – its color will just be a little pale.
- Troubleshooting make ahead gravy: The nice thing about gravy is it’s pretty forgiving! You can play with a couple of variables to achieve just the right texture and consistency:
- My gravy is too thick! ⇢ You just need more liquid! Whisk in some extra turkey or chicken broth a few tablespoons at a time until it’s thinned out to your liking.
- My gravy is too thin! ⇢ You simply need to thicken it. If the gravy is slightly too thin, just crank up the heat, letting it simmer until it’s thickened up a bit – be sure to whisk constantly to prevent burning. If your gravy seems way too thin, add a thickening agent. The best option is prepping a quick cornstarch slurry by mixing cornstarch with cold water. Whisk the slurry into the gravy little by little – it only takes a small amount to make your gravy thicken up!
- Storage and Reheating: Leftover reheated make ahead gravy (i.e. prepared through Step 4 of Recipe Directions, above), will keep, stored in an airtight container in the refrigerator for up to 5 days. Reheat in the microwave or on the stovetop until warmed through.