
Description
Rich, flavorful pork shoulder is studded with garlic & cooked low & slow with onions, apples, & a tangy apple cider braising liquid until succulent & completely fall-apart tender. Served alongside easy roasted garlic whipped butternut squash, this Apple Cider Braised Pork Shoulder is the ultimate fall comfort food meal!
Ingredients
Scale
- 3-4 pounds boneless half pork butt roast, cut into 3-4 large pieces
- 8–10 cloves garlic, sliced in half lengthwise
- 2 tablespoons Simply Nature Grapeseed Oil
- 1 1/2 cups Nature’s Nectar Apple Cider
- 1/2 cup Simply Nature Organic Chicken Broth
- 1/4 cup Simply Nature Organic Apple Cider Vinegar
- 2 tablespoons Burman’s Dijon Mustard
- 1 large red onion, thinly sliced
- 3 medium Granny Smith apples, peeled, cored, & cut into 1/2-inch thick slices
- kosher salt & ground black pepper, to season
for the roasted garlic whipped butternut squash:
- 1 small butternut squash (roughly 2 pounds), quartered lengthwise & deseeded
- 1 head garlic
- 1 teaspoon Simply Nature Grapeseed Oil
- 2-3 tablespoons Countryside Creamery Unsalted Butter, cut into tablespoons
- kosher salt & ground black pepper, to season
Instructions
- Preheat the oven to 325 degrees F, ensuring a rack is positioned in the center of the oven. Gather ingredients, prepping & measuring according to the Ingredients List, above.

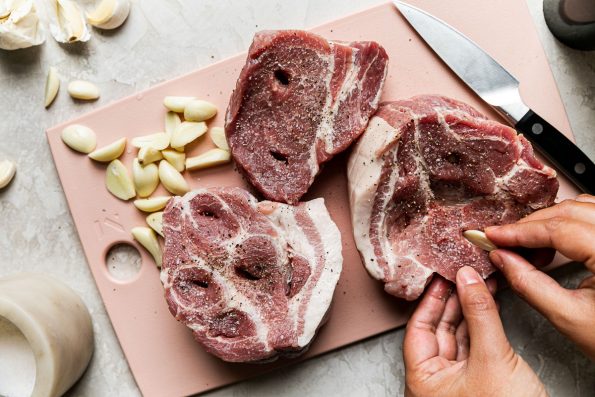
- Stud the pork with garlic: Using a sharp paring knife, carefully cut a few deep slits into each piece of pork shoulder, then insert sliced garlic into each pocket. Generously season the pork with 1 tablespoon kosher salt & ground black pepper as desired.
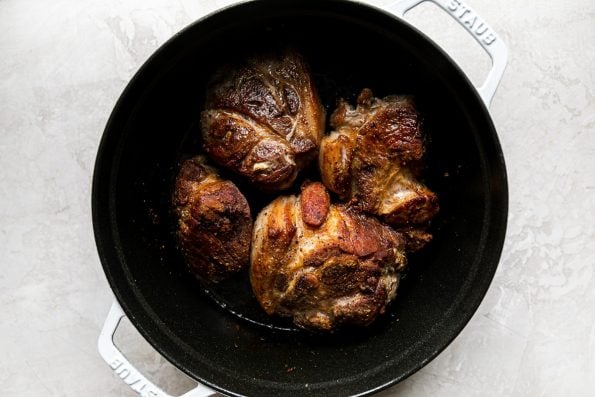
- Sear the pork: Add the grapeseed oil to a large, heavy-bottomed, oven-safe pot with a lid over medium-high heat (I use a 4-qt Dutch oven). Once the oil is hot & shimmering, carefully add in the prepared pork. Work in batches, as needed, to avoid overcrowding the pot (which prevents browning). Cook 3-4 minutes per side, until deeply browned.
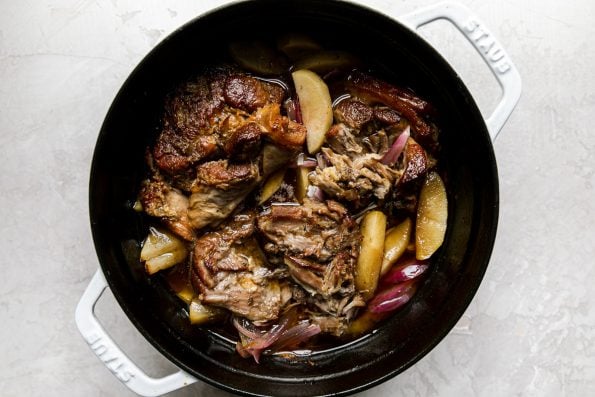
- Braise the cider pork: Add the apple cider, chicken broth, apple cider vinegar, & Dijon mustard to a large liquid measuring cup or bowl, whisking to combine. Carefully pour the apple cider brining liquid into the pot with the pork. Bring the mixture to a boil, then cover the pot & transfer to the oven. Cook for 2 1/2 – 3 hours, until the cider braised pork is fall-apart tender. About 30 minutes before you’re ready to shred the pork, remove the pot from the oven & stir in the sliced onion & apples. Cover & return to the oven for 20-25 minutes, just until the onions & apples are softened.
- Optional: Roast butternut squash & garlic: If preparing the whipped roasted garlic butternut squash, place the squash on a small sheet pan. Chop just the top off of the head of garlic, revealing its cloves. Lightly rub the garlic to loosen and remove any excess paper. Wrap the garlic in foil, lightly drizzling with oil & seasoning with a pinch kosher salt & ground black pepper before you seal the foil, completely encasing the garlic in foil. Set the foil-wrapped garlic on the sheet pan with the butternut squash. Transfer to the oven to bake alongside the apple cider braised pork for 2 1/2 – 3 hours, or until the squash is very tender. (Note: The garlic will roast in about 45 minutes, so set a timer to remove from the oven at that point!)

- Optional: Whipped roasted garlic butternut squash: Once the squash is very tender, remove the sheet pan from the oven. Carefully scoop the squash into a food processor. Add in the roasted garlic cloves (the cloves should squeeze out of the head very easily) & butter. Run the food processor until the mixture is smooth & creamy. If needed, pour in a splash of chicken broth to loosen up the mixture as needed to reach desired consistency. Stir kosher salt & ground black pepper, to taste – I start with 1/2 teaspoon & go from there.

- Finish the cider braised pork: Once the pork is tender, remove the pot from the oven. Carefully transfer the pork to a plate or cutting board. Use tongs or 2 forks to shred the pork into bite-sized pieces.
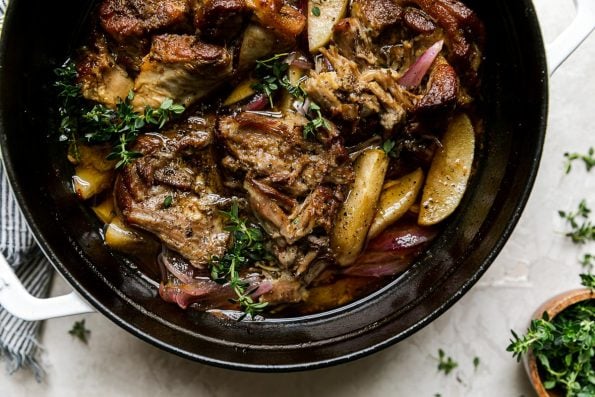
- Serve: Spoon the whipped roasted garlic butternut squash over a plate. Top with cider braised pork, softened apples & onions, & braising jus as desired. Enjoy!

Notes
- Other serving ideas: My favorite way to serve this apple cider braised pork is with the whipped roasted garlic butternut squash detailed in the Recipe Directions, above. It also makes fantastic pulled pork sandwiches, piled high with the braise-y apples, onions, a quick slaw, & your BBQ sauce of choice –the Burman’s Regional Style BBQ Sauces from ALDI are fantastic. You could also serve this braised pork with its braising liquid over pasta, such as egg noodles or spatzle – yum!
- Storage, Reheating, & Freezing:
- Storage & Reheating: This cider braised pork stores incredibly well! Transfer cooled pork to an airtight container with the braising liquid & braise-y apples & onions. Store in the refrigerator for 4-5 days. Easily reheat on the stovetop or in the microwave & serve as desired.
- Freezing Instructions: This cider braised pork is also incredibly freezer-friendly. To freeze, transfer cooled cider pork, braising liquid, & braised apples & onions to a freezer container or divide between multiple freezer containers for smaller portions. Freeze for up to 3 months. To thaw, place the frozen cider pork in the refrigerator overnight or submerge the freezer container in room temperature water for a quicker thaw. Easily reheat on the stovetop or in the microwave & serve as desired.
- Alternate cooking methods:
- Slow Cooker Apple Cider Braised Pork: Prep the recipe according to Steps 2-5, above, assembling the cider braised pork in your slow cooker or Crockpot. Slow cook on high for 4-5 hours or on low for 7-8 hours until the pork is fall-apart tender. Complete the recipe according to Step 8, above, & serve. If your slow cooker has a searing/browning feature, you can use it to cook this entire cider braised pork recipe (Steps 2-5, 8) in the slow cooker.
- Electric Pressure Cooker Apple Cider Braised Pork: Use your electric pressure cooker’s “Sauté” setting to cook the recipe according to Steps 2-5, above. Cover & seal the pressure cooker. Cook on manual high pressure for 50 minutes. Allow the pressure cooker to naturally release pressure for 15 minutes before carefully flicking the valve to its “venting” position to vent out any residual pressure. Finish as directed in Step 8.